Quick Links Settings

The Quick Links Settings in Orangescrum Cloud let you customize which shortcuts appear in your top navigation menu.

These quick links provide one-click access to essential tools like creating new projects, checking reports, tracking resources, or managing company-wide settings — all from anywhere in your workspace.

Think of Quick Links as your personal control panel — helping you reach your most-used modules faster.

Categories of Quick Links

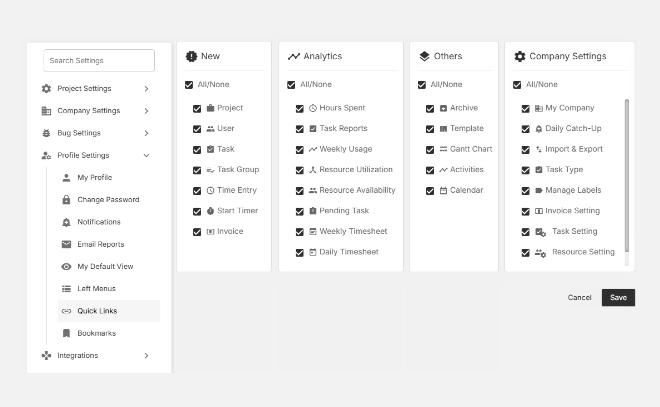
Quick Links are organized into four major sections for better customization and visibility.

Category Description
New Create or add new items quickly such as projects, tasks, users, or invoices.
Analytics Access time, usage, and performance reports instantly.
Others Navigate to general tools like Gantt charts, templates, activities, or calendars.
Company Settings Jump directly to workspace and configuration settings without switching menus.

New

The New section provides shortcuts to create new records within Orangescrum.

Option Description
Project Create a new project instantly.
User Add new users to your workspace.
Task / Task Group Quickly add tasks or group them under phases.
Time Entry Log work hours directly.
Start Timer Start real-time time tracking.
Invoice Generate a new invoice for a project.

Toggle “All/None” to select or deselect all creation shortcuts at once.

Analytics

This section gives quick access to performance, utilization, and productivity insights.

Option Description
Hours Spent Review total logged hours per user or project.
Task Reports Generate and view reports on task progress.
Weekly Usage Monitor overall workspace activity.
Resource Utilization / Availability Analyze workload and identify free capacity.
Pending Task View tasks still awaiting completion.
Weekly / Daily Timesheet Access summarized or detailed timesheet views.

Ideal for managers and team leads tracking team performance.

Others

The Others section gives access to essential productivity tools and visual aids.

Option Description
Archive Access archived projects or tasks.
Template Manage saved task or project templates.
Gantt Chart Visualize project timelines and dependencies.
Activities View recent activity logs and updates.
Calendar See upcoming deadlines and events.

Company Settings

Get direct shortcuts to key configuration modules.

Option Description
My Company Manage your company information and workspace identity.
Daily Catch-Up Access daily progress summaries.
Import & Export Upload or download project/task data in bulk.
Task Type / Manage Labels Customize how tasks are categorized.
Invoice / Task / Resource Settings Manage project billing, task defaults, and resource configuration.

Use this section to quickly reach admin-level settings.

How to Customize Quick Links

  1. Go to Settings → Profile Settings → Quick Links.
  2. Review each category (New, Analytics, Others, Company Settings).
  3. Check or uncheck the boxes beside each feature to show or hide it.
  4. Click Save to apply your preferences.

How to customize quick links

Your selected shortcuts will appear as icons under the Quick Links menu at the top of your Orangescrum workspace.

Benefits

Faster Navigation – Access frequently used features in one click.
Role-based Control – Customize links depending on whether you’re a team member, project lead, or admin.
Simplified Workflow – No need to switch menus or search for common actions.

With Quick Links in Orangescrum Cloud, your most important tools are always one click away — saving time and keeping your workflow seamless.

Left Menu Settings

The Left Menu Settings in Orangescrum Cloud allow you to fully personalize your sidebar navigation. 

You can decide which modules appear in your left menu, reorder them, or remove those you don’t use frequently — keeping your workspace clean and efficient.

This customization ensures that every user, from project managers to developers, can focus on the tools and views most relevant to their role.

Understanding the Interface

Available Menu Items

This section (on the left side) lists all the modules that are not currently part of your sidebar navigation. You can drag and drop or click to add them into your Customize Left Menu panel.

Customize Left Menu

This section (on the right side) shows the active items currently displayed in your sidebar.

You can:

  • Add or remove modules like Dashboard, Projects, Tasks, Reports, etc.
  • Expand or collapse menu groups such as Tasks, Reports, or Bug Tracking.
  • Reorder modules based on priority using drag and drop.

Default Menu Options

Here are the commonly available modules that can be customized:

Module Description
Dashboard View an overview of project performance and key metrics.
Mention Access all mentions and communication directed to you.
Projects Manage all ongoing and archived projects.
Tasks Navigate to task lists, Kanban boards, and task creation screens.
Bug Tracking Manage and track issues or bugs in one place.
Time Log Log work hours, review timesheets, and track productivity.
Resource Mgmt Monitor team workload and allocation.
Reports Access project progress, timesheet, and performance reports.
Status Workflow Customize task stages and approval flows.
Backlog Review tasks and items planned for future sprints.
Active Sprint Manage and track active sprint boards.
Project Template Quickly create new projects using saved templates.

Top Menu Actions

Action Description
Add All Instantly add all available menu items to your sidebar.
Remove All Clear the entire sidebar and start fresh.
Expand All / Collapse All Expand or collapse all menu sections at once.
Reset Restore your sidebar to the original default layout.

How to Customize Your Sidebar

  1. Go to Settings → Profile Settings → Left Menus.
  2. Review available menu items on the left.
  3. Drag and drop items to the right (Customize Left Menu) panel or click Add All.
  4. Reorder modules based on your daily use.
  5. Click Save to apply changes.

How to customize your sidebar

Benefits

Streamlined Navigation: Access the tools you need faster.
Role-based Efficiency: Tailor your sidebar to match your workflow — whether you’re a developer, project manager, or QA.
Declutter Your Workspace: Remove unused modules for a clean, distraction-free view.

With Left Menu Settings in Orangescrum Cloud, you design your own navigation experience — simple, fast, and completely personal.

My Default View

The My Default View section in Orangescrum Cloud allows every user to choose how they want to visualize their work — whether as a list, card, or board view.

By setting default views, you save time switching between layouts and create a personalized workspace that matches your workflow.

Customize your task, project, and time log views to focus on what matters most — productivity and clarity.

View Options

You can set default views for the following modules:

Module Available Views Description
Tasks List / Kanban / Calendar Choose how you want tasks to appear by default. The List View provides structured details, while Kanban gives a drag-and-drop visual workflow.
Time Log List / Weekly View logged hours in a simple list or weekly breakdown. Perfect for tracking time across days or projects.
Projects Card / List Display your projects as Cards for quick summaries, or as a List for a more detailed view.

How to Set Your Default Views

  1. Go to Settings → Profile Settings → My Default View.
  2. Select your preferred layout for each module — Tasks, Time Log, and Projects.
  3. Click Save to apply your preferences.

How to set your default views

Benefits of Custom Default Views

Saves Time: Skip switching layouts every time you log in.
Improves Focus: Work in the format that best fits your role — list for details, cards for visual flow.
Boosts Productivity: Each team member can tailor their workspace to their personal workflow style.

With “My Default View” in Orangescrum Cloud, you control how your workspace looks — ensuring every session starts exactly the way you like it.

Email Reports Settings

The Email Reports section in Orangescrum Cloud allows users to configure automated reports that provide regular insights into task progress, team utilization, and overall project performance.

These reports help project managers, team leads, and stakeholders stay informed — without logging into the system frequently.

Email Reports make sure you never miss key updates, helping you plan resources and timelines efficiently.

Types of Email Reports

Weekly Usage Report

Keep track of workspace usage and task activity over time.

You can choose how often you’d like to receive this report:

Option Description
Daily Receive usage insights every day.
Weekly Get a weekly summary of project and task activity.
Monthly Receive a monthly overview of your workspace usage.
None Disable weekly usage reports.

Task Reports

Stay informed about task progress and deadlines through automated updates.

  • Task Status Report – Get task completion and status summaries.
  • Task Due (Daily) – Receive reminders for upcoming or overdue tasks every day.

You can turn these reports ON (Yes) or OFF (No) based on your preference.

Daily Update Report

This option allows you to receive a daily snapshot of all activities performed in your workspace, such as new tasks, comments, or progress updates.

Field Description
Send me Email Enable/disable daily updates across all assigned tasks and projects.

Management Reports

Enable management-level reporting to monitor project progress against planned metrics.

Field Description
Send Project Estimation vs Actual Sends a report comparing estimated vs. actual task hours to evaluate project efficiency.

Useful for project owners, PMs, and stakeholders tracking time utilization and budget variance.

Team Utilization Reports

Measure how effectively your team’s time is being utilized.

Field Description
Send Team Utilization Report Enables automatic delivery of team performance and time utilization data.
Choose a day for sending notification Pick a day of the week when you’d like to receive this report.
Notify To Choose who receives the report
Compare with actual hours Choose whether the report should reflect

These reports provide valuable insights into workload balance, productivity, and time allocation.

How to Configure Email Reports

  1. Navigate to SettingsProfile SettingsEmail Reports.
  2. Choose which reports you want to receive by selecting Yes or No.
  3. Set the frequency (Daily, Weekly, Monthly).
  4. Assign recipients if applicable (Owner/Admin).
  5. Click Update to save your preferences.

How to configure email reports

Best Practices

✅ Enable Weekly Usage Reports for consistent project health tracking.
✅ Activate Task Due (Daily) to avoid missed deadlines.
✅ Use Estimation vs Actual and Team Utilization Reports to improve project accuracy and forecasting.
✅ Review your settings monthly to ensure reports align with your current role or needs.

With Email Reports in Orangescrum Cloud, you get actionable insights delivered automatically — helping you stay proactive, informed, and always in control of your projects.

Notification Settings

The Notification Settings section in Orangescrum Cloud allows you to customize how and when you receive updates related to your projects and tasks.

You can choose between email notifications and desktop notifications to stay on top of all important activities — from new tasks to comments and status changes.

This feature helps ensure you never miss critical updates while keeping your inbox and workspace clutter-free.

Adjusting notification preferences gives you complete control over the alerts you receive — whether you prefer instant updates or minimal interruptions.

Types of Notifications

1. Email Notifications

Receive instant email alerts for important events in your projects. You can enable or disable any of the following:

Notification Type Description
All New Task Get notified every time a new task is created and assigned to you or your project.
All Task Reply & Comment Receive emails when someone replies to or comments on a task you’re part of.
All Task Status Change Stay informed whenever the task status changes (e.g., In Progress → Completed).
All mentions in the Task and Comment Receive notifications whenever someone mentions you using @yourname in tasks or comments.

To modify these, simply select Yes or No next to each option.

2. Desktop Notifications

Stay updated directly from your browser without checking your email.

Turn on Enable Desktop Notification to receive alerts for new tasks, comments, or mentions while working.

Supported browser versions include:

  • Firefox v22 and above
  • Chrome v32 and above
  • Safari v6 (Mac OS X 10.8+) and above

Make sure browser notifications are allowed for Orangescrum Cloud in your browser settings.

How to Update Notification Settings

  1. Go to Settings → Profile Settings → Notifications.
  2. Choose Yes or No for each email notification option.
  3. Enable or disable desktop notifications as needed.
  4. Click Update to save your preferences.

How to update notification settings

Best Practices

✅ Keep Task Status and Mentions notifications enabled to stay in sync with your team.
✅ Use desktop notifications if you prefer quick updates without opening your inbox.
✅ Review notification settings periodically to match your current workflow.

With Notification Settings in Orangescrum Cloud, you can balance awareness and focus — staying informed about what matters most, without unnecessary distractions.

Set Password

The Change Password section in Orangescrum Cloud allows users to securely update their account password.

Changing your password regularly helps keep your workspace and project data safe from unauthorized access.

This feature is especially useful when you suspect unusual activity, share a system temporarily, or need to comply with your organization’s security policy.

Tip: Always choose a strong and unique password — avoid reusing old or common passwords.

How to Change Your Password

  1. Go to Settings → Profile Settings → Change Password.
  2. Enter your Old Password to verify your identity.
  3. Type a New Password — it must be 8 to 30 characters long.
  4. Re-enter the same password in Confirm Password.
  5. Click Change to update your credentials.
  6. You’ll see a confirmation once your password is successfully changed.

How to change your password

Best Practices for Password Security

✅ Change your password at least once every 90 days.
✅ Never share your credentials with others.
✅ Use a secure password manager to store passwords safely.
✅ Immediately update your password if you notice suspicious login activity.

The Change Password feature in Orangescrum Cloud ensures that every user maintains account confidentiality and keeps their projects, tasks, and reports protected at all times.