Set Password

The Change Password section in Orangescrum Cloud allows users to securely update their account password.

Changing your password regularly helps keep your workspace and project data safe from unauthorized access.

This feature is especially useful when you suspect unusual activity, share a system temporarily, or need to comply with your organization’s security policy.

Tip: Always choose a strong and unique password — avoid reusing old or common passwords.

How to Change Your Password

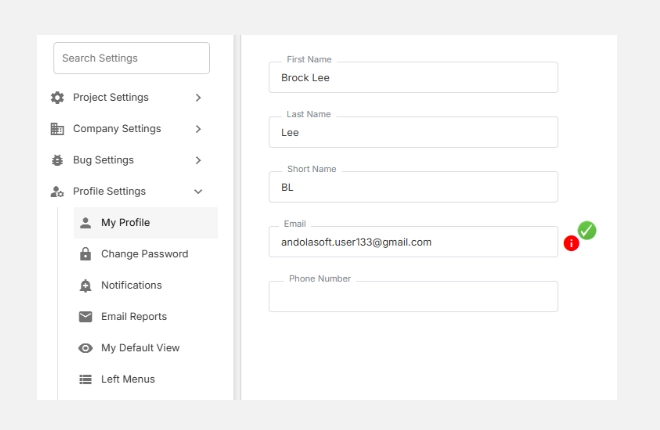
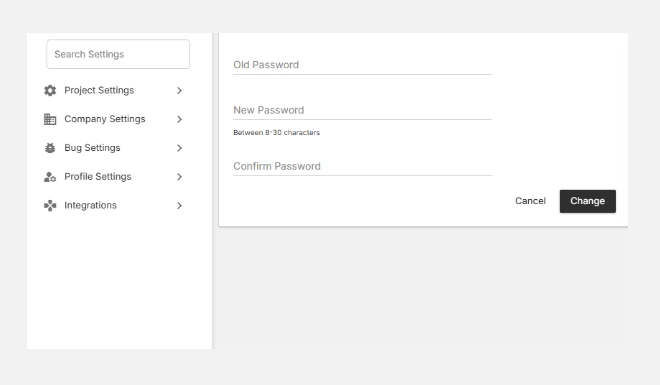
  1. Go to Settings → Profile Settings → Change Password.
  2. Enter your Old Password to verify your identity.
  3. Type a New Password — it must be 8 to 30 characters long.
  4. Re-enter the same password in Confirm Password.
  5. Click Change to update your credentials.
  6. You’ll see a confirmation once your password is successfully changed.

How to change your password

Best Practices for Password Security

✅ Change your password at least once every 90 days.
✅ Never share your credentials with others.
✅ Use a secure password manager to store passwords safely.
✅ Immediately update your password if you notice suspicious login activity.

The Change Password feature in Orangescrum Cloud ensures that every user maintains account confidentiality and keeps their projects, tasks, and reports protected at all times.

My Profile

The My Profile section allows each user to personalize their Orangescrum experience by managing their identity, contact details, and workspace preferences.

Here, you can update your name, email, time zone, language, time format, and upload a profile image — ensuring your account is accurate and consistent across your projects.

Keeping your profile updated helps team members identify you easily in projects, tasks, and reports.

Fields Available in My Profile

Field Description
First Name / Last Name Your official name as it appears across projects, tasks, and communications.
Short Name Abbreviation or initials (e.g., AN) used in dashboards, comments, and quick views.
Email Your registered email address used for login and notifications.
Phone Number Optional — add your contact number for internal reference or team directories.
Time Zone Choose your preferred time zone to ensure all tasks, logs, and reports show accurate timestamps.
Daylight Saving (DST) Enable or disable DST adjustments based on your region.
Language Select your preferred language for interface labels and menus.
Time Format Choose between a 12-hour or 24-hour format for all date/time displays.
Skills Mention your core skills or areas of expertise — useful for team visibility and resource allocation.
Profile Image Upload a profile photo to personalize your workspace and make collaboration more intuitive.

How to Update Your Profile

  1. Go to Settings → Profile Settings → My Profile.
  2. Update the desired fields such as name, email, or timezone.
  3. Click Save to apply your changes.
  4. Your updates will instantly reflect across your Orangescrum account.

How to update your profile

Best Practices

✅ Use your official name and company email for team identification.
✅ Keep your time zone and language settings aligned with your working location.
✅ Update your profile photo to help teammates recognize you in discussions and reports.
✅ Review and refresh your details periodically, especially when changing roles or locations.

With My Profile in Orangescrum Cloud, every user can create a personalized workspace that reflects their identity, time preferences, and communication style — ensuring smoother collaboration and better visibility across teams.

Profile Settings

The Profile Settings in Orangescrum Cloud allow each user to customize how they interact with the platform. From managing your personal details and password to setting up notifications, reports, and quick-access menus — everything can be fine-tuned here to match your workflow.

These settings enhance productivity and comfort, ensuring you get the right information at the right time while keeping your workspace organized and secure.

Key Options in Profile Settings

Option Description
My Profile Update your personal details such as name, email, and profile image.
Set Password Change your login password securely at any time.
Notifications Control which alerts you receive for tasks, projects, or updates.
Email Reports Schedule and receive regular reports about projects, tasks, or time logs directly in your inbox.
My Default View Choose your preferred dashboard or module view when you log in.
Left Menus Customize the items displayed on your left navigation panel for faster access.
Quick Links Create shortcuts to your most-used modules, pages, or tools.
Bookmarks Save and manage frequently accessed pages or project views for quick reference.

Tip: Adjusting your profile settings helps streamline your daily workflow and ensures that Orangescrum adapts perfectly to your role, preferences, and priorities.

Bug Resolution

Bug Resolution in Orangescrum Cloud represents the final status or action taken on a reported issue.

It helps your team record how each bug was handled — whether it was fixed, rejected, duplicated, or could not be reproduced.

This setting brings clarity to your QA cycle and enables better reporting on software quality and resolution trends.

Example: A bug marked as Fixed indicates it has been resolved, while Duplicate shows that a similar issue already exists in the tracker.

Why Use Bug Resolution

  • Clarify outcomes: Record the final result of every issue.
  • Enhance reporting: Filter and analyze resolved, duplicate, or invalid bugs.
  • Track QA efficiency: Understand how many bugs are successfully fixed versus deferred.
  • Reduce confusion: Maintain transparency on why an issue was closed.

Accessing Bug Resolution Settings

  1. Navigate to Settings → Bug Settings → Resolution.
  2. You’ll see a predefined list such as Fixed, Duplicate, Will Not Fix, Can Not Reproduce, Not an Issue, and N/A.
  3. You can add, edit, or remove resolutions to align with your internal QA process.

Accessing bug resolution settings

Common Bug Resolution Types

Resolution Description
Fixed The bug has been successfully corrected and verified.
Duplicate The bug is already reported in another ticket.
Will Not Fix The issue is acknowledged but won’t be fixed (low impact or outside scope).
Can Not Reproduce QA could not replicate the bug based on current data.
Not an Issue The reported behavior is intentional or not a defect.
N/A (Not Applicable) The bug report was invalid or no longer relevant.

Tip: Standardizing resolutions helps your reporting stay accurate across multiple projects and releases.

Adding a New Bug Resolution

  1. Click + New Bug Resolution (top-right corner).
  2. Enter a clear, descriptive Resolution Name (e.g., Deferred, Won’t Fix in Current Version).
  3. Click Add to save it.
  4. The new option will be available for selection when updating a bug’s status.

Adding a new bug resolution

Editing or Deleting Resolutions

  • To Edit, click the icon next to a resolution.
  • To Delete, click the icon to remove outdated options.

Editing or deleting resolutions

Note: Removing a resolution does not delete existing bugs but unlinks that resolution type from future records.

Bug Origin

Bug Origin in Orangescrum Cloud helps teams trace where in the project lifecycle a defect was introduced — such as during Requirements, Design, or Development.

By recording the origin of bugs, project managers and QA teams can analyze process gaps, improve quality controls, and reduce recurrence in future cycles.

Example: If a defect is traced back to the Requirements phase, it means the issue originated from unclear specifications rather than poor coding.

Why Use Bug Origin

  • Improve root cause analysis: Identify the source of recurring defects.
  • Enhance team accountability: Pinpoint which stage needs better QA checks.
  • Improve quality metrics: Track bug density by lifecycle phase.
  • Strengthen prevention strategies: Focus on process improvements early in the cycle.

Accessing Bug Origin Settings

  1. Go to Settings → Bug Settings → Origin.
  2. You’ll see default origins like Requirements, Design, and Development.
  3. Add or edit these to match your internal project lifecycle.

Accessing bug origin settings

How It Works

Each bug logged in Orangescrum can be tagged with its Origin.

This makes it easy to track not just when an issue occurred but where it started.

Field Description Example
Bug Origin The phase where the defect was introduced. Requirements, Design, Development
Usage Selected during bug reporting or analysis. Helps QA trace the source of errors

Tip: Combine “Origin” with “Root Cause” and “Phase” fields to conduct deeper defect trend analysis.

Adding a New Bug Origin

  1. Click + New Bug Origin (top-right).
  2. Enter the Origin Name — e.g., Testing, Deployment, Documentation.
  3. Click Add to save.
  4. The new origin will now appear in your selection list when creating or updating bugs.

Adding a new bug origin

Editing or Deleting Origins

  • Click Edit to rename an existing origin.
  • Click Delete to remove outdated or unused origins.

Editing or deleting origins

Note: Removing a Bug Origin unlinks it from existing bugs but doesn’t delete those issues.

Bug Affect Version

Affect Version in Orangescrum Cloud helps you record where a defect was first found — the specific product or project version affected by the issue.

It’s a vital part of release management that ensures bugs are traced to their origin and verified properly during regression testing.

Example: If a bug appeared in V30 but was fixed in V31, the Affect Version indicates where the problem originated, helping QA confirm it no longer exists in newer builds.

Why Use Affect Version

  • Trace defect origin: Identify which release introduced the issue.
  • Support regression testing: Test fixes against the same version the bug appeared in.
  • Improve reporting: View defect trends per release.
  • Enhance visibility: Understand how product updates affect system stability.

Accessing Affect Version Settings

  1. Navigate to Settings → Bug Settings → Affect Version.
  2. You’ll see a list of configured versions (e.g., V30).
  3. Add, edit, or remove versions as your project evolves.

Accessing affect version settings

How It Works

When a bug is logged, the reporter selects the Affect Version — indicating which release was impacted.

Later, the Fix Version field can be used to mark the version where it was resolved.

Field Description Example
Affect Version The version where the issue was found.

V30

Fix Version The version where the issue was fixed.

V31

Tip: Keeping both fields updated provides full visibility into bug lifecycles across versions.

Adding a New Affect Version

  1. Click + New Affect Version (top-right).
  2. Enter a clear Version Name (e.g., V30, Release 2.0).
  3. Click Add to save it.
  4. The version becomes selectable in bug reports.

Adding a new affect version

Editing or Deleting Versions

  • To Edit, click the icon next to the version.
  • To Delete, click the icon to remove unused versions.

Editing or deleting versions

Note: Deleting a version unlinks it from bugs but does not delete the bugs themselves.