Timesheet Settings

The Timesheet Settings section in Orangescrum Cloud allows you to configure who approves team timesheets within your workspace.

This ensures that all logged hours — whether for tasks, projects, or clients — go through an approval process before they are finalized for reporting or invoicing.

By defining Timesheet Approvers, organizations can maintain accuracy, accountability, and transparency in their time tracking and billing operations.

Example: A project manager can be set as the approver for their team’s timesheets, ensuring all time entries are reviewed before invoicing the client.

Why Use Timesheet Settings

  • Ensure accuracy: Validate work hours before billing or payroll.
  • Assign approvers: Designate who reviews and approves timesheets per project.
  • Maintain accountability: Keep track of who approved or rejected time entries.
  • Improve reporting: Only approved timesheets are included in cost and resource reports.

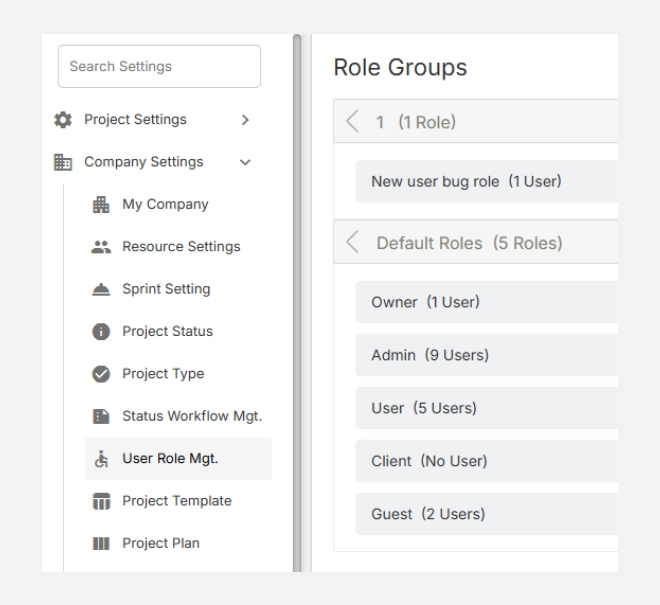
Accessing Timesheet Settings

  1. Navigate to Settings → Company Settings → Timesheet Settings.
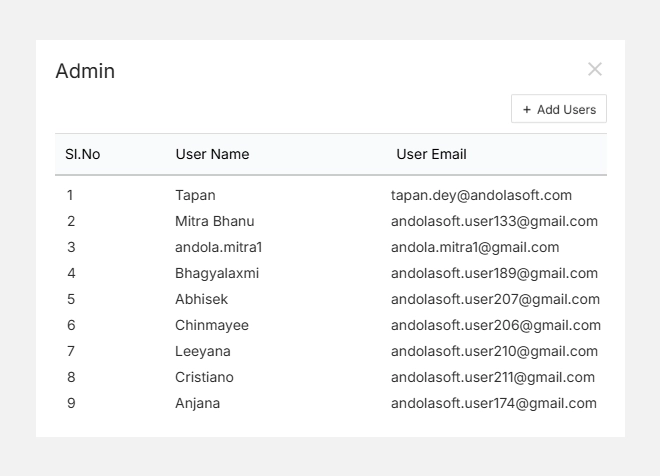
  2. You’ll see a list of all existing approvers, along with their email addresses, approval status, and pending timesheets.

Understanding the Interface

Field Description
Name Displays the approver’s name and profile picture.
Email The approver’s registered email address in the workspace.
Pending Approvals Number of timesheets awaiting review from that approver.
Status Indicates whether the approver is Active or Inactive.
Action Allows you to edit or remove an approver.

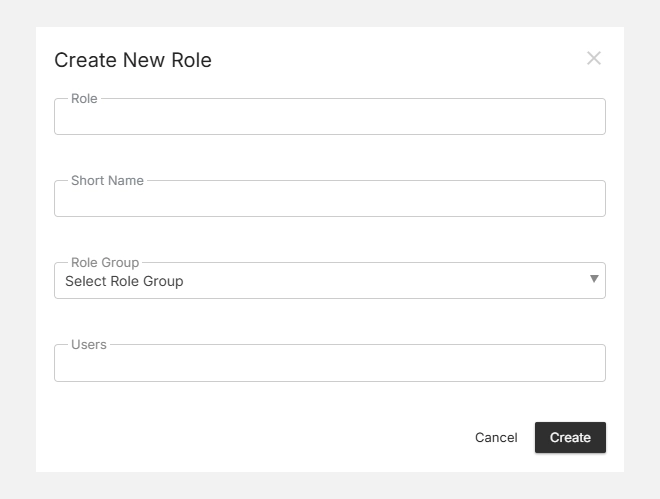
Adding a Timesheet Approver

  1. In the Select Approver field, start typing the user’s name.
  2. Select the desired user from the dropdown list.
  3. Click Add Approver.

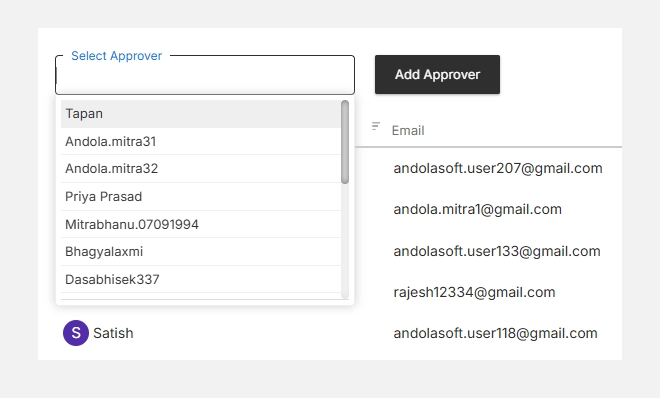
Once added, the user will appear in the list of active approvers and will begin receiving timesheet approval requests for relevant team members.

Note: Only Admins or authorized users can manage approvers in Timesheet Settings.

Managing Approvers

You can update, activate/deactivate, or remove approvers anytime:

  • Edit Approver: Update details or reassign approval rights.
  • Deactivate: Temporarily disable an approver without removing them.
  • Delete: Permanently remove a user from the approver list.

All changes reflect instantly across ongoing timesheet submissions.

Timesheet Approval Flow

  1. A team member submits their weekly or daily timesheet.
  2. The assigned approver receives a notification.
  3. The approver reviews the entries, validates hours, and approves or rejects them.
  4. Once approved, the time logs are automatically marked as billable (if applicable).

This workflow helps maintain precision in both client billing and internal project cost tracking.

With Timesheet Settings in Orangescrum Cloud, you can ensure that every logged hour is validated, every project remains transparent, and every invoice is backed by verified data.

Project Templates

The Project Template feature in Orangescrum Cloud allows you to create new projects quickly using predefined frameworks.

Instead of building each project from scratch, simply choose a template that matches your workflow — such as Scrum, Kanban, Bug Tracking, or Content Management.

Each template comes with built-in structures like task types, statuses, workflows, and permissions — helping your team get started faster and stay consistent across projects.

Example: A marketing team can start with the “Content Management” template to plan campaigns, while a software development team can use “Scrum” for sprint-based planning.

Why Use Project Templates

  • Save setup time — start projects instantly with pre-defined structures.
  • Maintain consistency — ensure all projects follow your standard workflows.
  • Built-in best practices — each template includes optimized settings for different project types.
  • Customizable — edit or extend any template to match your organization’s needs.

Accessing Project Templates

  1. Navigate to Settings → Company Settings → Project Template.
  2. You’ll see a library of available templates categorized by workflow type.
  3. Each template card displays a title, description, and a “Create Project” button.

Available Templates

Template Name Description Ideal For
Simple Do more than just “manage” — organize, assign, and track tasks easily. General project management
Scrum Create backlog items, manage sprints, and track progress visually. Agile software teams
Kanban Visualize work progress on boards with customizable statuses. Continuous delivery teams
Bug Tracking Capture, prioritize, and resolve issues using a structured workflow. QA and testing teams
Content Management Plan and release content with review and approval steps. Marketing, editorial teams
Task Tracking A minimal To-Do–based project structure for small teams. Personal or lightweight team projects
Recruitment Manage hiring stages from job posting to onboarding. HR and recruitment teams
Procurement Track procurement from RFP to order completion. Operations and purchase departments

Each template is designed to fit specific business use cases while remaining flexible enough to customize.

Creating a New Project from a Template

  1. Choose a template that suits your workflow.
  2. Click “Create Project.”
  3. Enter your project details (name, start/end date, members, etc.).
  4. Review the predefined setup — including workflow, task types, and permissions.
  5. Click Save to launch your project instantly.

Your new project will now include all the template’s preloaded configurations — ready to go from day one

Customizing Project Templates

You can tailor existing templates or create new ones to fit your company’s unique processes.

Common customizations include:

  • Adding new task types or labels
  • Adjusting workflow statuses
  • Editing automation rules
  • Assigning role-based permissions

Tip: Use custom templates for repeating project types like client onboarding, product releases, or marketing campaigns.

User Role Management

The User Role Management feature in Orangescrum Cloud allows workspace admins to define, group, and manage different roles within your organization — ensuring clarity of responsibility and structured collaboration across projects.

Instead of assigning permissions individually for every user, you can create Role Groups (like Engineering Team or QA Team) and define specific roles within each group (such as Frontend Developer, QA Lead, or Project Manager).

Example: You can create a “Marketing Team” group and define roles such as Campaign Manager, Content Writer, and SEO Analyst — each representing a clear position within the team.

Why Use User Role Management

  • Better organization — structure your workspace by departments or teams.
  • Role clarity — every team member knows their position and assigned duties.
  • Streamlined project setup — quickly assign predefined roles to new users.
  • Consistency across projects — maintain uniform role definitions across the company.
  • Simplified reporting — analyze productivity and workload by role.

Accessing User Role Management

  1. Navigate to Settings → Company Settings → User Role Mgt.
  2. You’ll see a categorized list of existing Role Groups (such as QA, Engineering, Project Manager, etc.) along with their respective roles.

Understanding Role Groups

A Role Group represents a department, discipline, or function within your organization (e.g., QA Team, Project Managers, Engineering, Marketing).

Each Role Group contains multiple Roles, which define specific positions within that group.

Example Setup:

Role Group Roles Inside
QA Sr. QA Manager, QA Lead, QA Engineer
Project Management Project Manager
Engineering Team Backend Lead, Frontend Developer, Full-Stack Developer
DevOps DevOps Engineer

This grouping makes it easier to add or remove roles and assign them to users as your team grows.

Adding a New Role Group

  1. Click the “+” icon beside any section to add a new role group.
  2. Enter a descriptive group name — e.g., Design Team or HR Department.
  3. Click Save.

Your new Role Group will now appear in the list and can have roles added under it.

Adding a Role Within a Group

  1. Click the “+” icon inside the chosen Role Group (e.g., QA or Engineering).
  2. Enter the Role Name — such as Automation Tester, Content Strategist, or UI Designer.
  3. Optionally, assign users immediately or leave it empty for future assignment.
  4. Click Save.

Your new role will appear nested under the selected Role Group.

Editing or Deleting Roles

  • Click the Edit icon beside a role to rename or update it.
  • Use the Delete icon to remove a role that’s no longer needed.
  • You can also assign users directly to a role by clicking the User icon.

Note: Deleting a role removes it from all linked users, but it does not delete the users themselves.

Project Status Settings

The Project Status section in Orangescrum Cloud allows you to define how project progress is tracked across your organization.

Each project passes through different phases — from initiation to completion — and using clear, consistent statuses helps your team and stakeholders understand where each project stands.

Example: A marketing agency might use statuses such as “Planning,” “Execution,” and “Completed,” while a construction firm could have “Design Approval,” “Procurement,” and “Site Work.”

Why Use Project Status

  • Consistency: Maintain uniform progress stages across all projects.
  • Visibility: Instantly identify where each project stands.
  • Tracking: Simplify reporting and filtering by project status.
  • Customization: Tailor default statuses to match your team’s workflow.

Accessing Project Status Settings

  1. Go to Settings → Company Settings → Project Status.
  2. You’ll see two sections:
    • Default Project Status — Predefined system statuses like Started, Completed, On Hold, and Stack.
    • Custom Project Status — Statuses you can create based on your organization’s workflow.

Custom Project Status

Custom statuses allow you to define additional lifecycle stages unique to your company or domain.

For instance:

  • For a Legal Firm: File Organization, Trial Preparation, Case Closure
  • For a Software Company: Requirement Gathering, QA Review, Release Pending
  • For a Construction Team: Design Approval, Procurement, Site Execution

Each custom status provides greater control and visibility over specialized workflows.

Adding a New Project Status

  1. Click + New Project Status in the top-right corner.
  2. Enter the name of your new status (e.g., Client Review or Final Documentation).
  3. Click Add to add it to your list.

Your new status will appear under Custom Project Status and can be assigned to any active or future project.

Editing or Removing a Status

  • To rename or modify a custom status, click the status name and make your changes.
  • To remove a status, uncheck it or delete it from the list.
    (Default statuses cannot be deleted.)

Resource Settings

The Resource Settings section in Orangescrum Cloud helps you configure your organization’s working structure — including daily working hours, weekends, holidays, and resource availability rules.

These settings ensure that project timelines, workload distribution, and resource utilization reports accurately reflect your team’s actual working schedule.

Example: If your company works 9 hours per day, Monday to Friday, and observes alternate Saturdays as holidays — configuring this once ensures every project and time log automatically follows that structure.

Why Use Resource Settings

  • Accurate scheduling — ensure deadlines and workloads are aligned with working days.
  • Realistic resource planning — view actual team availability before assigning tasks.
  • Improved reporting — track effort and utilization accurately.
  • Centralized control — define global working rules for the entire organization.

Accessing Resource Settings

  1. Navigate to Settings → Company Settings → Resource Settings.
  2. You’ll see options to set working hours, weekends, and holidays, as well as enable or disable resource tracking features.

Configuring Resource Settings

Follow these steps to customize your company’s working calendar:

Enable Resource Availability Tracking

Turn on the “Use Resource Availability” toggle to activate resource tracking.

This allows Orangescrum to calculate workload and availability for each user based on your defined working hours and holidays.

Enable Task Estimation Hour Splitting

Toggle “Use Task Estimation Hour Splitting” if you want tasks with multiple assignees to automatically divide estimated hours among them.

This ensures balanced workload distribution and realistic planning.

Set Working Hours

In the Work hours of your company field, specify your standard daily working hours.

Example: Enter “9” for a 9-hour workday. All time logs, workload charts, and utilization calculations will use this as a baseline.?

Define Weekends

Select your company’s weekly holidays.

Example: Check Saturday and Sunday for a standard weekend. You can also mark 2nd and 4th Saturdays as holidays — common in many organizations.

Add Company Holidays

Under Set the holiday list, add official holidays for the year.

Example:

  • 05/25/2024 – Voting Day
  • 12/25/2024 – Christmas

You can also:

  • Click Add More to include multiple holidays.
  • Click Remove to delete old or incorrect entries.

Save Changes

Click Save at the bottom-right corner once all fields are configured.

My Company Settings

The Company Settings section in Orangescrum Cloud allows administrators to manage all organization-level configurations in one place. 

From setting up your company profile, logo, and time zone to defining holidays, working days, and default task behaviors — this is where you establish how your workspace operates. 

It ensures that every project and user follows a consistent structure aligned with your company’s standards. 

Whether you’re onboarding new teams or scaling operations, configuring Company Settings is the first step toward building an organized, branded, and efficient Orangescrum workspace.

My Company

The My Company section in Orangescrum Cloud lets you personalize your workspace by adding your organization’s key information — including company name, contact details, billing address, logo, and preferred currency.

These details appear on invoices, reports, and automated communications, helping you maintain a consistent and professional brand identity across all projects.

Example: If your company “Acme” manages multiple client projects, configuring My Company ensures all generated invoices and communications reflect Acme’s name, logo, and address automatically.

Why Use “My Company”

  • Brand consistency — add your logo, website, and address for a professional touch.
  • Regional accuracy — select your default time zone and currency for localized billing.
  • Centralized information — manage key organizational details in one place.
  • Auto-filled data — information here populates across invoices, reports, and notifications.

Accessing My Company Settings

  1. Go to Settings → Company Settings → My Company
  2. You’ll see editable fields for company details, contact info, and branding.

Setting Up Your Company Details

To configure your company information:

  1. Name — Enter your company’s legal or display name.
  2. Orangescrum URL — This is your unique workspace URL 
    • This field is auto-generated during workspace creation.
  3. Website — Add your official company website (optional).
  4. Contact Number — Enter a valid business phone number.
  5. Currency — Choose your organization’s default currency (e.g., USD, EUR, INR).
    • This setting impacts billing, time logs, and invoice calculations.
  6. Billing Address — Add your office or corporate address.
    • You can use rich text formatting (bold, lists, etc.) for clean presentation on invoices and reports.
  7. Logo — Upload your company logo to brand your workspace and client-facing documents.
    • Recommended size: at least 200×200 pixels.

Once done, click Update to save your changes.

How It Looks

After saving, your company details automatically appear in:

  • Invoices and billing templates
  • Reports and exports
  • Client communications and emails
  • Workspace header and profile menus (for Admins)

Editing or Updating Company Details

  • You can update your company details anytime by revisiting Settings → My Company.
  • Click Update after making any changes.
  • Updated data reflects immediately across all modules (invoices, exports, reports).

Note: Changing currency or billing details affects new invoices only; previously created ones remain unchanged.