The Company Settings section in Orangescrum Cloud allows administrators to manage all organization-level configurations in one place.
From setting up your company profile, logo, and time zone to defining holidays, working days, and default task behaviors — this is where you establish how your workspace operates.
It ensures that every project and user follows a consistent structure aligned with your company’s standards.
Whether you’re onboarding new teams or scaling operations, configuring Company Settings is the first step toward building an organized, branded, and efficient Orangescrum workspace.
My Company
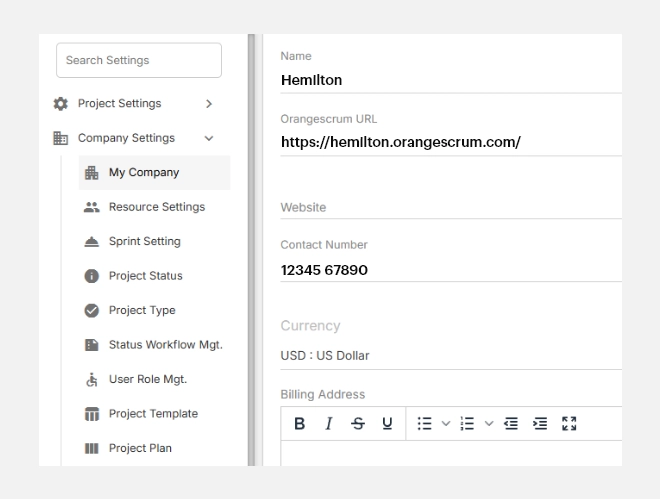
The My Company section in Orangescrum Cloud lets you personalize your workspace by adding your organization’s key information — including company name, contact details, billing address, logo, and preferred currency.
These details appear on invoices, reports, and automated communications, helping you maintain a consistent and professional brand identity across all projects.
Example: If your company “Acme” manages multiple client projects, configuring My Company ensures all generated invoices and communications reflect Acme’s name, logo, and address automatically.
Why Use “My Company”
- Brand consistency — add your logo, website, and address for a professional touch.
- Regional accuracy — select your default time zone and currency for localized billing.
- Centralized information — manage key organizational details in one place.
- Auto-filled data — information here populates across invoices, reports, and notifications.
Accessing My Company Settings
- Go to Settings → Company Settings → My Company
- You’ll see editable fields for company details, contact info, and branding.
Setting Up Your Company Details
To configure your company information:
- Name — Enter your company’s legal or display name.
- Orangescrum URL — This is your unique workspace URL
- This field is auto-generated during workspace creation.
- Website — Add your official company website (optional).
- Contact Number — Enter a valid business phone number.
- Currency — Choose your organization’s default currency (e.g., USD, EUR, INR).
- This setting impacts billing, time logs, and invoice calculations.
- This setting impacts billing, time logs, and invoice calculations.
- Billing Address — Add your office or corporate address.
- You can use rich text formatting (bold, lists, etc.) for clean presentation on invoices and reports.
- You can use rich text formatting (bold, lists, etc.) for clean presentation on invoices and reports.
- Logo — Upload your company logo to brand your workspace and client-facing documents.
- Recommended size: at least 200×200 pixels.
Once done, click Update to save your changes.
How It Looks
After saving, your company details automatically appear in:
- Invoices and billing templates
- Reports and exports
- Client communications and emails
- Workspace header and profile menus (for Admins)
Editing or Updating Company Details
- You can update your company details anytime by revisiting Settings → My Company.
- Click Update after making any changes.
- Updated data reflects immediately across all modules (invoices, exports, reports).
Note: Changing currency or billing details affects new invoices only; previously created ones remain unchanged.