Understanding the Scrum Team and Scrum Roles

The Scrum Body of Knowledge Guide (SBOK Guide) has very well defined Scrum roles for successful implementation of Agile Scrum Methodology for product development and project delivery.

In the previous chapter, we provided an overview of how agile methodology came to life and how it gained popularity over the years and was widely accepted across industries.

Continuing our efforts to help you gain more insights into the agile methodology, we would like to help you understand the basics of the Scrum Team and Scrum Roles.

Take a look at the below image to understand how the Scrum Roles are constituted and look in an actual Scrum implementation.

The Major Scrum Roles are

  • The Product Owner
  • The Scrum Master
  • The Development Team
  • The Scrum Team or the Scrum Core Team

The Product Owner

Product Owner (PO) is undoubtedly the “voice of the customer“. He owns the product end to end and is responsible for the overall product delivery.

As explained by the Scrum Guide –

“Product owner is a scrum development role for a person who represents the business or user community and is responsible for working with the user group to determine what features will be in the product release.”

Having said that it is important to understand the characteristics or expertise of the Product Owner.

He has the most challenging role of wearing multiple hats throughout the product development journey.

  • Communicator
  • Subject Matter Expert
  • End User Advocate
  • Business Advocate
  • Decision Maker

A Product Owner plays a crucial role in disseminating the vision and intent of the product, its detailed features, design and the single person to maximize the return on investment of product.

His leadership skills are tested to the core as he is one tasked with conflicting goals, opinions and make decisive final call.

For all practical purposes he is the Backlog Owner. The end to end responsibility of managing, prioritizing and deciding what goes in and out of the backlog lies on the Product Manager.

Some of the key activities in Backlog Management include:

  • Expressing the Product Backlog Items in detail.
  • Ensuring that the Product Backlog is transparent and understood by everyone who would be impacted by the product.
  • Ordering the Product Backlog in such a way that it optimizes the value of work done by the development team
  • Making sure that the Product Backlog raises transparency to the extent that it is clear what the Scrum team is going to work on next.
  • Raising the transparency of Product Backlog to a level where stakeholders can see how value is being added to the Product.
  • Helping Development Team with Product Backlog Items (PBI) refinement.

Another important responsibility of the Product Manager is to define the “Acceptance Criteria” and ensure that they are met.

SBOK Guide also maintains that –

The Product Owner is one person, not a committee. The Product Owner may represent the desires of a committee in the Product Backlog, but those wanting to change a Product Backlog item’s priority must address the Product Owner.

The Scrum Master

As the name indicates, the Scrum Master is one of the most important members of the Scrum Core Team.

A Scrum Master is a “Servant Leader“. He is expected to have maximum influence and impact but has minimum to almost no authority.

The primary objective of the Scrum Master is to promote the Scrum Methodology as per the SBOK Guide and help everyone involved understand the Scrum theory, values, practices, roles and events.

But, overall a Scrum Master is a “facilitator“. He ensures the development team are provided with a conducive environment to function in a self-organizing manner.

The Scrum Master helps the Development Team and the Product Owner to identify and remove impediments.

Scrum Master also helps the Product Owner understand, adopt and practice scrum to perform his activities successfully.

Overall a Scrum Master is a SME and enables scrum adoption across the organization.

Let us look at the Scrum Master’s service to the Product Owner, Development Team and Organization in detail below.

Product Owner Development Team Organization
Finding techniques for effective Product Backlog management Coaching the Development Team in self-organization and to work cross functionally Leading and coaching the organization in its Scrum adoption
Helping the Scrum Team understand the need for clear and concise Product Backlog items Helping the Development Team to create high-value products Planning Scrum implementations within the organization
Understanding product planning in an empirical environment Removing impediments to the Development Team’s progress Helping employees and stakeholders understand and practice Scrum and empirical product development
Ensuring the Product Owner knows how to arrange the Product Backlog to maximize value Coaching the Development Teams within the organization Enabling changes that increases the productivity of the Scrum Team
Understanding and practicing agility Help understand and adopt Scrum Methodology Enable Scrum adoption to achieve business value
Facilitating Scrum events as requested or needed Facilitating Scrum events as requested or needed Working with other Scrum Masters to increase the effectiveness of the application of Scrum in the organization

The Development Team

The Development Team consists of professionals who do the work of delivering a potentially releasable Increment of “Done” product at the end of each Sprint.

Only members of the Development Team create the Increment.

Basic Attributes of the Development Team:

  • Self-Organizing: The Development Team selects the work that it is supposed to do during the Sprint. No one, not even the Scrum Master/PO tells the Development Team how they are going to deliver the potentially releasable increment.
  • Cross-Functional: The Development Team has all the necessary skill-set required to convert the selected Product Backlog items into a potentially releasable increment.
  • Size: The optimal size for the Development Team is 3-9 members. With less than 3 members, the Development Team may not have enough skill-set to create the potentially releasable increment. Having more than 9 members on the Development Team may create additional complexity which might be difficult to be managed with the empirical process.
  • Title: There is only one title in the Development Team and that is “Developer”. Scrum recognizes no other titles. It also discards the notion of sub-teams.

The Development team is accountable for delivering an increment of potentially releasable “Done” product at the end of the Sprint. The Development Team is also accountable for the quality of the “Done” product increment as per the acceptance criteria.

Overview of the Development Team

  • Cross-functional, multi-learning and self-organizing, and while individuals often have specialized skills or areas of focus, accountability belongs to the team as a whole
  • Build and deliver the potentially shippable product increment from planning, analysis, design, programming and testing
  • Development Teams tend to have between 3 to 9 team members. Preferably dedicated.
  • Responsible for building the actual product Increment
  • Performs the development and testing of the product
  • Outlines the tasks that need to be completed in order to develop a feature/user story
  • Should be full-time
  • Ideally, membership should change only between sprints
  • Strong Cross Matrix of skillset with Developers having enough insight to ask business questions
    • Works with the Product Owner to drive ambiguity lower
    • Works to continuously improve the application and the methods/processes the team utilizes
  • Members are dynamic with enough experience to be able to handle a variety of coding elements, for example:
    • .NET developer who is able to perform a DBA low level task
    • DBA/ETL duties should be combined within a single resource
    • All resources should be geared toward Test Driven Development and be able to perform testing
    • Business Analyst should have Data Analyst skill set with a Quality Assurance mindset and ability to formulate Acceptance Criteria with Product Owner
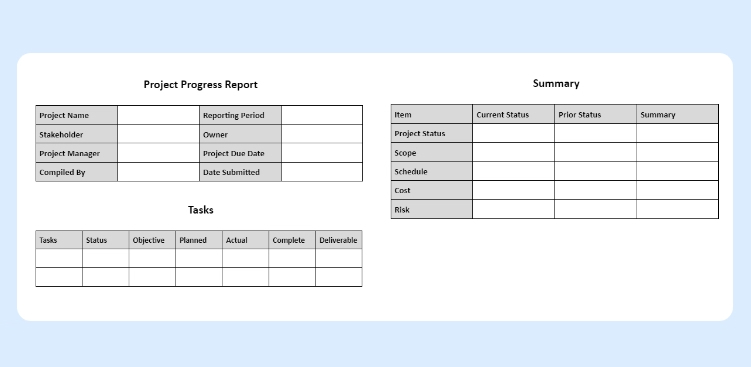
Summary

Agile Methodology maintains distinct roles and responsibilities of the Scrum team thereby enabling absolute collaboration, swift conflict resolution and increases the team’s accountability and ownership.

The guiding principle being “self-organizing” goes a long way in making the team responsible towards their goals. They choose what going to be done with in a sprint and how long will be the sprint.

Overall, a product increment is delivered faster and with quality as the focus is on an increment instead of a huge delivery thereby reducing distractions and improving execution.

Introduction to Scrum Methodology

Where it all began!

First steps towards the Scrum Methodology were taken in the year 1986, by 2 Japanese experts of commercial product development – Hirotaka Takeuchi and Ikujiro Nonaka. They published an article – “New Product Development Game” in the Harvard Business Review. (Yes 2 News!)

Interestingly, the Total Quality Management (TQM) came out of the manufacturing industry and so did Agile and Scrum. Hirotaka and Ikujiro referred numerous use cases from the automotive and printer manufacturing firms. And another striking similarity – the very evident Japanese connection again!

Through their research they ascertained that – small, self-organizing teams fed with clear objectives and when given the freedom to develop their own execution strategy are proven to be highly successful in achieving their goals – quality products and services!

The main focus of Scrum is – Speed and Flexibility and though born out of manufacturing it was adopted and widely popularized by Jeff Sutherland & Ken Schwaber for software development in 1995.

Another interesting aspect about the Agile methodology is the Scrum Framework. Scrum was inspired by the game of Rugby and its principle of breaking the game into individual touchdowns rather than running the Hail Mary every time!

The Agile Manifesto

However, it was not until the February of 2001 when the “Agile Manifesto” was signed and released by the seventeen participants including Ken and Jeff. The history of agile manifesto is a good read for all agilists to understand how “Agile and Scrum” as we know it today came into being.

The most noteworthy outcomes of the Agile Manifesto are:

  • 4 Core Values
    • Individuals and interactions over processes and tools
    • Working software over comprehensive documentation
    • Customer collaboration over contract negotiation
    • Responding to change over following a plan
  • 12 Principles
    • Our highest priority is to satisfy the customer through early and continuous delivery of valuable software.
    • Welcome changing requirements, even late in development. Agile processes harness change for the customer’s competitive advantage.
    • Deliver working software frequently, from a couple of weeks to a couple of months, with a preference to the shorter timescale.
    • Responding to change over following a plan
    • Business people and developers must work together daily throughout the project.
    • Build projects around motivated individuals.
    • Give them the environment and support they need, and trust them to get the job done.
    • The most efficient and effective method of conveying information to and within a development team is face-to-face conversation.
    • Working software is the primary measure of progress.
    • Agile processes promote sustainable development.
    • The sponsors, developers, and users should be able to maintain a constant pace indefinitely.
    • Continuous attention to technical excellence and good design enhances agility.
    • Simplicity–the art of maximizing the amount of work not done–is essential.
    • The best architectures, requirements, and designs emerge from self-organizing teams.
    • At regular intervals, the team reflects on how to become more effective, then tunes and adjusts its behaviour accordingly.

What is Scrum?Now, the Scrum we know today is the hard work of Ken and Jeff who pioneered it into the mainstream of software development.

Scrum as explained by Scrum Alliance is “a process framework that has been used to manage work on complex products since the early 1990s. Scrum is not a process, technique, or definitive method. Rather, it is a framework within which you can employ various processes and techniques. Scrum makes clear the relative efficacy of your product management and work techniques so that you can continuously improve the product, the team, and the working environment.”

The Scrum Framework consists of

  • Scrum Team
  • Scrum Events
  • Scrum Artefacts
  • Scrum Rules

Understanding Scrum: The Benefits

While we will be discussing all aspects stated above in the coming chapters, I would like to complete the Scrum Introduction with some of its benefits as food for thought for you

Going back to the basics or the roots, Agile Methodology is all about making things happen and if I may, is born out of the practical experience and a more pragmatic approach to the long standing problems faced during product manufacturing and development.

Think of the key highlights of discussions with your customers and team members. I am sure the below items would just stand out and stare right at you:

If it is a customer

  • I would have liked the speed of delivery to be better.
  • I like the new feature(s) or modification(s) you proposed, but can we reduce the cost?
  • I am not signing another cheque unless I see a working product.
  • How soon can you help me go-to-market or release for actual use?
  • I want more control over the development process

And when it is our team

  • We aren’t clear of the requirements – What exactly does the customer want?
  • It cannot be delivered as per the current timelines
  • We need more hours, more time
  • Why should we work on weekends?
  • Will this product ever see the light of the day?

See what I mean? Both of them are right in their own ways and there approach or concerns are justified too. There is a distinct disconnect – even though both have the right intent towards the product our long standing ways of developing product doesn’t allow for the much needed true sync between the critical stakeholders.

Hence, the agilists came up with multiple agile methodologies such as Lean, Kanban, Six Sigma, Scrum etc. And Scrum Project Methodology has proven to be the most relevant for software development projects in today’s business landscape.

Stay tuned for detailed coverage of the Scrum Methodology in the upcoming chapters.

A Detailed Google Tasks Guide to Make Task Management Easier

Making a list is everyone’s habit, no matter if you are planning a special day, event or a work week. A simple to-do list comes in handy at those times. Google Tasks is a digitized version of a to-do list.

Google Tasks wasn’t popular until Google decided to give it the much needed thrust and make it part of the Gsuite itself.

Here is a detailed guide on how you can use Google Tasks.

How to use Google Tasks with G-mail

As we said earlier Google gifted us all with Google Tasks, and it synced its essential products with the app. Not just Google Calendar but now you can sync your tasks with your G-mail too.

This feature is valuable given, making a list is everyone’s habit. No matter whether we are planning a trip, or a party. A simple to-do list comes in handy at those times.


How to Open Google Tasks

You might have never realized but Google Tasks had been staring right at your face when you opened G-mail. Let us show you how to open it.

  • Log into your Gmail
  • Once you open your Mail, on the right, Click Tasks 
  • Click on the Add a Task button, or the “+” sign
  • Type your Task Title,
  • Click on the Edit option, the pencil sign
  • Add Title, Add description about Tasks
  • Add it to a Task List if any
  • Set Date & Time, choose the day, and the hour
  • Also, set the task on repeat if you want to with – Daily, Weekly, Monthly or yearly
  • Congratulations, you have successfully added your task.

How to Create a Task List

  • Follow the same procedure, Login to your Gmail.
  • Once you open your Mail, on the right Click Tasks 
  • Click the down arrow on My Tasks
  • Select Create New list

If you want to change the Task List of a Task then, you can do so by

  • Choosing the Task, Hover above the Pencil sign, which says “Edit Details
  • Click on the pencil sign
  • Click on the Drop arrow, and choose the relevant Task List

Tasks Lists make categorizing your tasks easy.

How to organize Tasks

Google Tasks doesn’t just have the “Tasks” option but it also has a sub-category, called the “Sub-task“. This option makes it easy and convenient to organize your tasks as per the hierarchy.

If you create a Task List titled “Work to get done this Weekend“, you can create two tasks under it, one is “Update Timesheet” and the other is the “Review Tasks for next week.” Instead of muddling those two together, you can create “sub-tasks” under each task.

This is how you efficiently and simply organize your tasks on Google Tasks. It isn’t fancy, with confusing features. It has easy to pick up features that come in handy in day-to-day life.

Reorder Tasks

This bit is easy and as simple as Google can get.

  • Open Google Tasks
  • Click on the Task and move it to where you want.

You can manually order your tasks and also sort it out according to their Date.

  • Open Google Tasks
  • On the right, click on the Tasks option
  • Then Click on More, the three dots on the side of Add a Task.
  • There will be an option “Sort By” – My Order and Date.
  • Click My Order, if you want to set it manually.
  • Select Date if you want the Task list in order of dates.

How to delete and complete a task

Google Tasks is a gift from Google to all. It is an efficient To-do list that can be used on a desktop, as well as a smart phone. Deleting a task is as easy as crossing off the task on a paper of To-Do list.

  • Open Google Tasks.
  • Hover above the pencil sign on the Task to be deleted.
  • Click on the pencil sign, which says “Edit Details“.
  • On, the top click “Delete“.
  • If you want to cancel it, click “Undo” on the bottom

After completing a task on the To-do list what is it we do? We check it off or strike it off. Google Tasks also follows this human tendency of striking off tasks that are completed.

When you are done with a task you created, you can mark it complete.

  • Open Google Tasks.
  • Hover above the Task you want to mark as complete.
  • Specifically hover above the circle near the task
  • It shows “Mark Complete“.
  • Click on that, and mark it as complete.
  • If you want to cancel it then click on “Undo” at the bottom.

Want to check which tasks are done?

  • Below the Tasks section, is a “Completed” section that has a Drop arrow.
  • Click on the drop arrow.
  • See all the tasks that are checked off

How to use Google Calendar with Google Tasks

What is the simplest way to make a time table? To organize your schedule according to your calendar. Google Tasks maybe the simplest form of the To-do list, but you can use Google Calendar and Google Tasks without switching between apps.

  • Open Gmail.
  • Click on How to complete Tasks Calendar
  • On the Calendar, section select the “Open in New Tab” option.
  • On the right-hand side of the screen, there are two other options, “Google Keep” and “Google Tasks
  • Choose Tasks

You get a calendar view of all your tasks for the day.

To-do apps mostly don’t provide a calendar within the app itself, but it is Google! You can sync your Calendar with GoogleTasks.

If you want to Edit the task from the Calendar itself you can do so too. Click on the respective task, and you can see a tile version of it.

There are options like “Edit Details“, “Delete” “Close“, “Mark Complete“, “View related email“.

Easily add an email as a task. If your work email id is in sync with your Google Tasks you can easily manage your tasks.

Here is how you can sync Google Tasks with G-mail without a hitch with just a Drag n Drop.

  • Open Gmail
  • Click on Google tasks
  • Select the Mail in your Inbox which you want to create as a task
  • Drag it and drop it on the “Add a New task” option
  • A task is created automatically
  • Add Date, Sub-Tasks and assign Task list.

The advantage of Google Calendar is, you can use it to create Reminders, Tasks, and Events. Just click on the Time Slot of a particular day and you can set a Task, Reminder or even an event.

Other than the much-used Google Calendar and G-mail, there is another app Google Keep that is under-utilized. But when coupled with Google tasks it becomes pretty useful.

How to use Google Keep along with Google Tasks

  • Open G-mail
  • Click on the Keep 
  • Choose the “Open in a new tab” option.
  • Click on the “Take a Note
  • Fill up the required details- “Title Note“, “Write a Note

  • Click on the bell option, to add the note as a “Reminder
  • Set the Task you want to be reminded of. Customize the reminder with respects to Date & Time and Place.
  • Change the color of the note to give a feeling of sticky notes.
  • Add relevant Image if you have to.

If you want to make the Note a Checklist, then click on the three dots- “More” option. Select the “Show checkboxes” option. Add Title to the note and items. It is a nice way to create a grocery list.

When you open Google Calendar, all your Tasks, Notes, Reminders and events pop up in a single place. If you are obsessed with organizing and being on top of your schedule then Google Tasks is your perfect companion for Task management.

How to manage Google Tasks with Google Shortcuts

  • New Task- Once you type a Task Title you can press “Enter
  • Move a Task- Ctrl + Up, shifts your selected task up
    Ctrl + Down, shifts the selected task down.
  • Task Details- To view Task details press Shift + Enter
  • To close Task Details press Esc
  • Mark a Task as complete- Press Alt + Enter
  • Remove a completed Task from the list – Alt + Shift + Enter

Benefits of using Google Tasks

  • Managing tasks manually, with sticky notes on your desk isn’t the way of handling projects. Google Tasks is a free task management tool that manages all your tasks in one place.
  • Use Google Calendar and Google Tasks side by side. You do not need to switch between windows, but can use Tasks, while on the Google Calendar. Both seamlessly blend into each other to provide a smooth user experience.
  • Sync your G-mail with Google Tasks. All the work mails you receive in your Inbox will automatically become tasks if you just drag n drop it in “Add a new task” option. It saves you a lot of complications.
  • Organize your tasks effectively with the sub-tasks and Task List options.
  • Add recurring tasks to your lists, like when you have to publish a blog post daily.

Google Tasks works effectively for basic task management. Orangescrum is a worthy alternative for it.

Orangescrum offers all that Google Tasks offers and so much more, from assigning tasks, setting task priorities to time tracking and calendar view, Orangescrum has got it all covered. Why settle for a to-do list when you can have an entire tool to yourself?

Creating Compelling Project

These visual tools offer a snapshot of project performance, enabling teams and stakeholders to make informed decisions and stay on track. Keeping projects on track, staying informed about progress, and making data-driven decisions are essential for achieving project goals.

A compelling project dashboard is more than just a collection of charts and metrics; it is a dynamic, visually engaging tool that offers a real-time snapshot of your project’s health. Whether you are a seasoned project manager or just embarking on your project management journey, this guide will provide valuable insights into creating project dashboards that truly make an impact.

Compelling Project

Why Project Dashboards Matter

Project dashboards serve as a central hub for project information and offer several benefits:

  • Real-time Insights: Project dashboards provide real-time or near-real-time insights into a project’s status, allowing stakeholders to stay informed and make timely decisions.
  • At-a-Glance Overview: Dashboards offer a concise, at-a-glance view of critical project data, helping stakeholders quickly assess progress and performance.
  • Data Visualization: Visual elements such as charts, graphs, and progress bars make complex project data more digestible and easy to understand.
  • Alignment: Dashboards help keep all team members and stakeholders aligned with project goals, priorities, and timelines.
  • Early Issue Identification: Issues and roadblocks are promptly identified through the dashboard, enabling proactive problem-solving.
  • Efficiency: By centralizing and automating data collection and presentation, project dashboards save time and reduce manual reporting efforts.
  • Customization: Dashboards can be tailored to the needs of different stakeholders, showing only the most relevant information to each audience
  • Historical Tracking: They offer historical data, allowing teams to track progress over time and identify trends or recurring challenges.
  • Communication: Dashboards facilitate transparent and effective communication among project stakeholders by providing a common reference point for discussions.
  • Decision Support: Project dashboards assist in data-driven decision-making by presenting key performance indicators and metrics that guide choices and strategies.
  • Accountability: They promote accountability by clearly displaying task ownership, deadlines, and milestones, ensuring that responsibilities are well-defined and understood.
  • Continuous Improvement: By analyzing historical dashboard data, project teams can identify areas for improvement and optimize future project processes.

Key Elements of Compelling Project Dashboards

To create a compelling project dashboard, consider the following key elements:

  • Clear Objectives and KPIs: Start by defining the project’s objectives and key performance indicators (KPIs). What does success look like, and how will you measure it? Align the dashboard with these objectives to ensure it provides relevant insights.
  • Relevant Metrics: Select metrics and data points that directly relate to the project’s goals. These might include task completion rates, project milestones, budget utilization, or resource allocation. Avoid cluttering the dashboard with unnecessary information.
  • Visual Appeal: A visually appealing dashboard is more engaging and easier to interpret. Use charts, graphs, color coding, and icons to present data in an understandable and aesthetically pleasing manner.
  • Real-Time Data: Keep the dashboard up to date with real-time or near-real-time data. Outdated information can lead to misinformed decisions. Integrating data sources and automation can help ensure data freshness.
  • Customization: Allow users to customize the dashboard based on their roles and responsibilities. Tailoring the view to specific audiences ensures relevance and usability.
  • Drill-Down Capability: Provide the option to drill down into details. Users should be able to explore underlying data and investigate issues or opportunities further.
  • Responsiveness: Ensure that the dashboard is responsive and accessible across different devices, including desktops, tablets, and smartphones. Accessibility is crucial for on-the-go decision-making.
  • Collaboration Features: Include collaboration features such as commenting, file sharing, or direct links to related tasks or documents. This promotes team collaboration and facilitates discussions on specific issues.
  • Performance Alerts: Implement performance alerts or notifications to proactively notify stakeholders of critical changes or issues. Timely alerts help prevent potential problems from escalating.
  • User Training: Offer training and support to dashboard users. Familiarizing them with the dashboard’s features and capabilities will maximize its effectiveness.

Popular Dashboard Tools

Several software tools and platforms make creating compelling project dashboards more accessible. Some popular options include:

  • Microsoft Power BI: A versatile business analytics tool that allows you to create interactive dashboards and reports.
  • Tableau: A leading data visualization platform that offers powerful dashboard-building capabilities.
  • Google Data Studio: A free tool from Google that lets you create customizable and shareable dashboards.
  • Orangescrum: A project management software with built-in dashboard features for task tracking, resource allocation, and more.

Conclusion

Project dashboards serve as dynamic, visual hubs that distill complex project data into accessible and actionable insights.

By following best practices, tailoring your dashboard to the unique needs of your project, and leveraging the right tools and technologies, you can craft project dashboards that are not only informative but also compelling. These dashboards become powerful tools for fostering transparency, collaboration, and efficiency within your project team.

Whether you are managing a small or large project, a single project or a portfolio of initiatives, project dashboards are essential for keeping everyone aligned, motivated, and focused on achieving common objectives. They serve as a central point of reference, enabling you to track progress, manage risks, and showcase accomplishments.

Project Status Reporting Templates

To simplify the process of creating these reports, many project managers turn to project status reporting templates. Moreover, a project status report, often referred to simply as a “status report,” is a document that provides a snapshot of the current state of a project.

It is a crucial tool in project management that serves multiple purposes, including keeping stakeholders informed, tracking progress, and identifying issues or risks. Project teams typically generate project status reports at regular intervals (e.g., weekly, bi-weekly, or monthly) and share them with team members, managers, sponsors, and other relevant stakeholders.

Project Status Report

The Importance of Project Status Reports

Project status reports serve multiple crucial purposes within an organization:

  • Transparency: Status reports provide transparency into the project’s progress, allowing all stakeholders to have a clear view of where the project stands.
  • Communication: They serve as a means of effective communication, ensuring that everyone involved in the project is on the same page regarding goals, progress, and challenges.
  • Accountability: Status reports assign responsibilities and tasks, fostering accountability among team members. They help track who is responsible for what and when it should be completed.
  • Risk Management: Status reports highlight potential risks and issues, allowing for proactive identification and mitigation, reducing the likelihood of last-minute crisis.
  • Decision-Making: Project managers and stakeholders rely on status reports to make informed decisions, allocate resources, and adjust project strategies as necessary.
  • Resource Allocation: They optimize resource allocation by giving a clear picture of resource usage and needs, ensuring teams allocate resources where they are needed most.
  • Stakeholder Engagement: Status reports engage and involve stakeholders in the project, keeping them informed and fostering their continued support and commitment.
  • Quality Control: Regular reporting helps maintain quality standards by monitoring deliverables, ensuring they meet defined criteria, and addressing quality issues promptly.
  • Documentation: Status reports serve as documentation of the project’s history, providing a valuable resource for future reference, audits, and post-project analysis.
  • Motivation: Status reports can motivate the project team by celebrating achievements and milestones, recognizing their hard work, and creating a sense of accomplishment and purpose.

The Role of Project Status Reporting Templates

Creating project status reports from scratch can be time-consuming and prone to inconsistencies. This is where project status reporting templates come into play:

  • Consistency: Templates ensure that project status reports are consistently structured and formatted, making it easier for stakeholders to navigate and understand the information.
  • Time Savings: Templates save time by providing a pre-established framework, allowing project managers to focus on content rather than formatting.
  • Clarity: Well-designed templates promote clear and concise communication by organizing information in a logical and easily digestible manner.
  • Alignment:Templates help maintain alignment with the organization’s reporting standards and ensure that all projects follow a common structure.
  • Efficiency: Using templates streamlines the report creation process, enabling project managers to generate reports more quickly and frequently, which is essential for agile project management.
  • Data Accuracy: Templates often include predefined fields that prevent important data from being omitted, reducing the risk of errors and inaccuracies in reporting.
  • Accountability: By providing a consistent structure, templates make it easier to assign ownership for specific sections or data points within the report, fostering accountability among team members.
  • Standardization: Using templates ensures that all stakeholders receive information in a standardized format, facilitating comparisons between different projects and timeframes.
  • Historical Record: Templates facilitate the creation of a historical record, allowing for the easy retrieval and analysis of past project status reports to identify trends, lessons learned, and areas for improvement.
  • Adaptability: While templates provide a structured framework, they are also adaptable. Project managers can customize them to suit the unique requirements of each project or organization, ensuring flexibility in reporting.

Common Elements of Project Status Reporting Templates

Project status reporting templates typically include the following elements:

  • Project Name:

The name of the project is typically at the top of the template, providing immediate identification.

  • Project Manager:

Clearly state the name and contact information of the project manager responsible for the project

  • Reporting Period:

Specify the period the report covers, which could be weekly, monthly, or as per the project’s reporting cadence.

  • Overall Project Status:

This section provides a high-level summary of the project’s current status, often using color-coding (e.g., green for on track, yellow for at-risk, red for delayed) to quickly convey the health of the project.

  • Key Milestones:

Include a list of significant milestones and their current status, indicating whether they are on schedule, completed, or delayed.

  • Key Performance Indicators (KPIs):

Additionally, display important metrics and KPIs relevant to the project’s success. Metrics might include budget, schedule, scope, and quality performance.

  • Work Completed:

Detail the tasks or deliverables that have been completed during the reporting period, emphasizing achievements and progress.

  • Work in Progress:

Outline tasks and deliverables that are currently in progress, including their expected completion dates.

  • Upcoming Activities:

Highlight future tasks, deadlines, and activities scheduled for the next reporting period, enabling stakeholders to anticipate what’s on the horizon.

  • Issues and Risks:

Document any problems or challenges encountered during the reporting period, as well as potential risks that could impact the project’s success. Include action plans for addressing these concerns.

  • Resource Allocation:

Specify how resources (human, financial, or materials) are allocated to the project, ensuring transparency and accountability.

  • Budget Status:

Report on the project’s budget status, including expenditures, variances, and any budget changes that occurred during the reporting period.

  • Stakeholder Engagement:

Describe how you engaged and informed stakeholders during the reporting period, and highlight any significant communications or feedback you received.

  • Appendices and Attachments:

Provide additional details, charts, graphs, or documents that support the information presented in the main report, such as project schedules or detailed financial reports.

  • Action Items:

Finally, conclude with a list of action items and recommendations, specifying responsible parties and deadlines for addressing issues and improvements.

Choosing the Right Template

Selecting the appropriate project status reporting template depends on the project’s complexity, the needs of stakeholders, and the reporting frequency.

There are various templates available, from simple one-pagers to more detailed reports with multiple sections. Therefore, project managers should choose a template that aligns with the project’s requirements.

In conclusion, project status reporting templates are invaluable assets for project managers and teams seeking to streamline the process of communicating project progress, goals, and challenges.

They offer a structured framework that helps ensure consistency and clarity in reporting, making it easier for stakeholders to understand a project’s status at a glance. Moreover, by utilizing well-designed status reporting templates, project managers can save time, enhance transparency, and foster effective communication with their teams and stakeholders.

These templates not only help keep projects on track but also provide the data needed to make informed decisions and adjustments when necessary. Customize your templates to include the most relevant information, and ensure that the data presented aligns with your project’s goals and objectives.

So, don’t hesitate to incorporate these valuable tools into your project management arsenal, and watch as your projects become more organized, efficient, and ultimately, more successful.