Project Templates

Create new projects faster with ready-made workflows designed for different use cases.

Overview

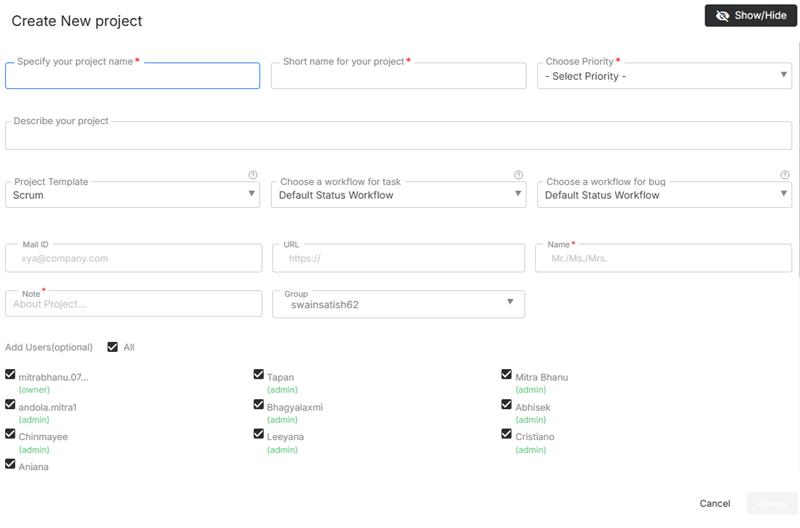
The Project Templates feature in Orangescrum Cloud allows you to quickly create new projects using predefined structures, workflows, and configurations.

Each template is purpose-built for a specific project type—whether it’s Agile, content management, recruitment, or procurement—so your team can start working instantly without setting up everything from scratch.

Think of templates as plug-and-play project frameworks — ready to launch, customizable to fit your process.

Why Use Project Templates?

  • Save time: No need to build new projects from scratch.
  • Consistency: Standardize processes across teams and departments.
  • Accuracy: Use pre-defined task types, workflows, and permissions aligned with your needs.
  • Scalability: Perfect for growing teams managing multiple similar projects.

Accessing Project Templates

  1. Go to your Project Template in the left side menu.
  2. Click Create Project to launch a new project based on the chosen template.

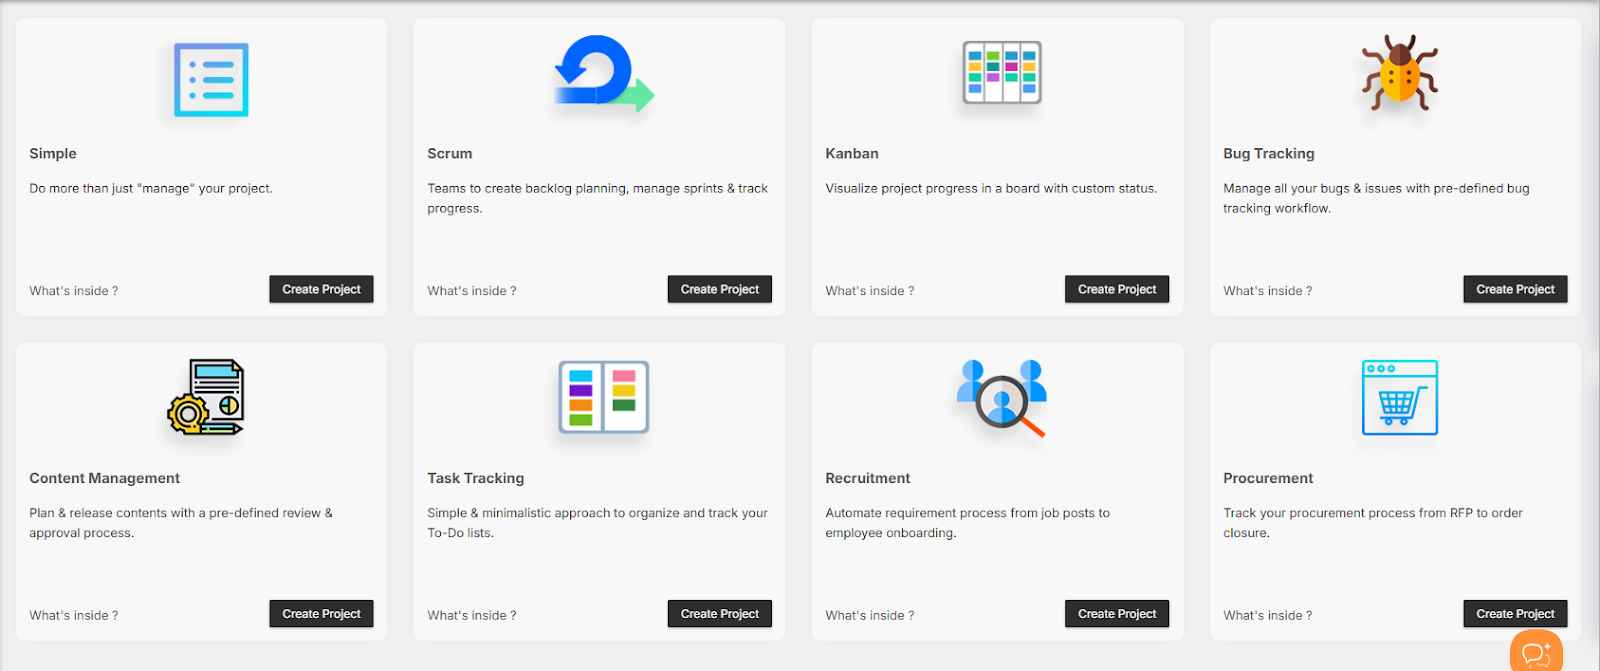
Available Project Templates

Orangescrum provides a variety of ready-to-use templates designed for different workflows and industries.

  • Simple Project Template

Best for: Small teams or general project management.

Description: Do more than just manage your project — track progress, tasks, and milestones easily.

Includes:

  • Default task stages: To-Do, In Progress, Completed
  • Basic task types and user permissions
  • Ideal for quick, flexible project tracking

Use this for short-term or cross-functional internal projects.

  • Scrum Project Template

Best for: Agile teams managing sprints and product backlogs.

Description: Designed to help Agile teams create backlogs, manage sprints, assign story points, and monitor burndown charts.

Includes:

  • Backlog and sprint boards
  • Story points, velocity tracking, and sprint planning
  • Task types like Epic, Story, Bug, Task
  • Predefined Agile statuses (To-Do → In Progress → QA → Done)

Perfect for software, IT, and product development teams.

  • Kanban Project Template

Best for: Visual workflow management and continuous delivery.

Description: Visualize your process using a Kanban board with custom columns representing workflow stages.

Includes:

  • Drag-and-drop task movement
  • Configurable status columns
  • Continuous work tracking with no fixed sprint cycles

Ideal for marketing, operations, or support teams.

  • Bug Tracking Template

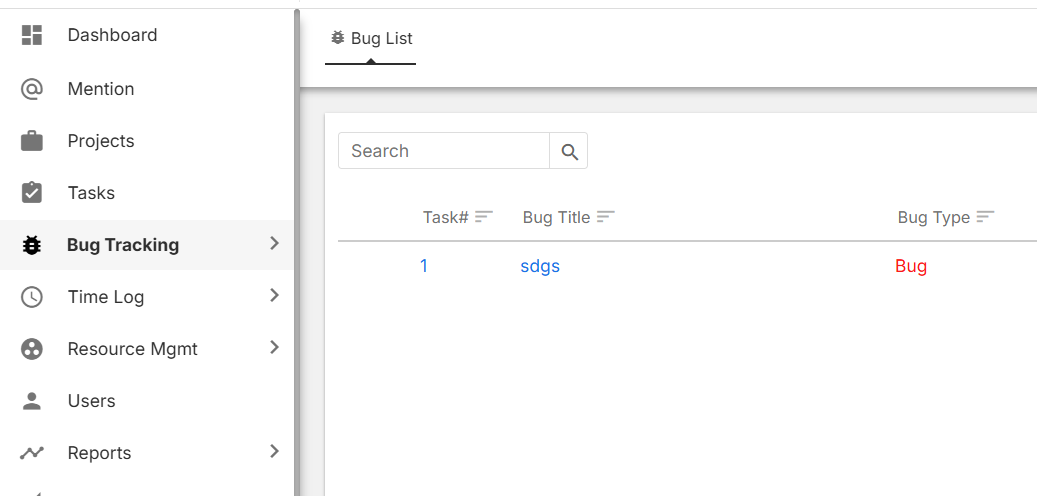
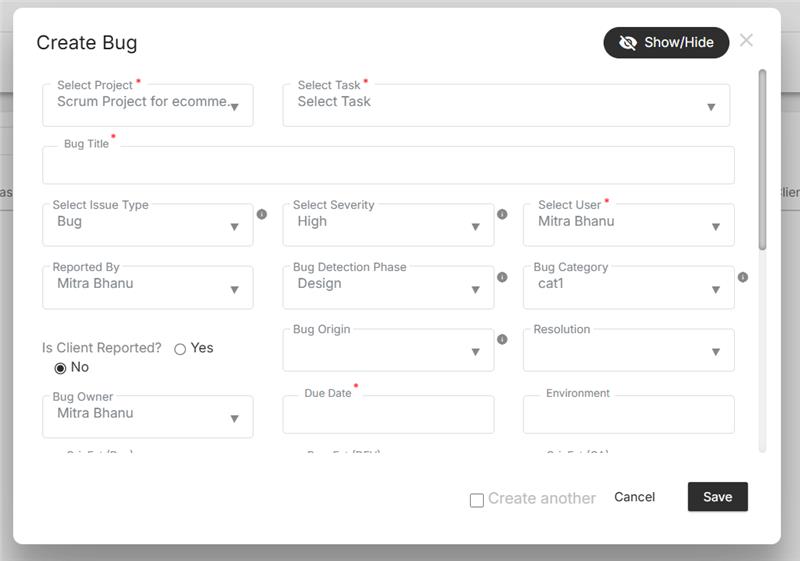
Best for: QA and development teams managing bugs and issues.

Description: Track and resolve bugs efficiently with a predefined bug tracking workflow.

Includes:

  • Bug categories and priorities (Critical, Major, Minor)
  • Statuses: New → In Progress → Fixed → Verified → Closed
  • Fields like Bug Origin, Resolution, Affect Version, Fix Version

Ensure software quality and issue transparency.

  • Content Management Template

Best for: Marketing, editorial, and content production teams.

Description: Plan, review, and publish content using a structured approval workflow.

Includes:

  • Task stages: Idea → Draft → Review → Approved → Published
  • Custom fields for content type, due date, and editor
  • Collaboration-ready task comments and attachments

Perfect for blogs, marketing campaigns, and creative assets.

  • Task Tracking Template

Best for: Individual contributors and small teams managing daily to-do lists.

Description: A minimalistic template to organize and track personal or team tasks.

Includes:

  • Simple task list and priority tags
  • Statuses: Open, In Progress, Completed
  • Option to add due dates, assignees, and attachments

Stay organized and keep work moving.

  • Recruitment Template

Best for: HR and recruitment teams managing hiring pipelines.

Description: Automate your recruitment process from job posting to candidate onboarding.

Includes:

  • Stages: Application Received → Screening → Interview → Offer → Hired
  • Task fields for candidate name, job title, and status
  • Workflow reports for hiring progress tracking

Ideal for tracking applicants and streamlining hiring cycles.

  • Procurement Template

Best for: Finance, procurement, and operations teams.

Description: Track your procurement process from RFP to purchase order closure.

Includes:

  • Task statuses: RFQ Sent → Quotation Received → Negotiation → Order Placed → Closed
  • Vendor and item tracking fields
  • Built-in cost visibility and document attachment options

Perfect for vendor coordination and budget control.

Customizing a Template

Once you create a project from a template, you can customize it fully:

  • Rename or remove task stages
  • Add or modify task types
  • Assign roles and permissions
  • Configure notifications and integrations

Each template serves as a foundation — you can build on top of it as your workflow evolves.

Duplicating or Reusing a Template

  1. Open an existing project.
  2. Click the Project Settings icon.
  3. Choose “Save as Template.”
  4. Enter a name and description.
  5. Your template is now available in the Project Templates list for reuse.

This feature is ideal for recurring project structures like campaigns, releases, or audits.

Benefits of Using Templates

Benefit Description
Speed Launch new projects instantly without setup delays.
Standardization Keep workflows consistent across teams and departments.
Productivity Spend less time on setup, more on execution.
Scalability Reuse successful project structures for new clients or initiatives.

Best Practices

  • Review each template’s workflow before creating a project.
  • Create department-specific templates (e.g., HR, Marketing, IT).
  • Use naming conventions for easy identification (e.g., Client-Onboarding-Template).
  • Save frequently used configurations as custom templates.

Templates are reusable systems — refine them as your team grows.

Access Control

Role Permission
Admin Create, edit, and delete templates.
Project Owner Use templates to create projects.
User View and join projects created from templates.

Only admins can modify or remove default system templates.

Summary

Template Purpose
Simple General project management.
Scrum Agile sprint planning and backlog tracking.
Kanban Visual workflow management.
Bug Tracking QA and issue tracking.
Content Management Editorial planning and approvals.
Task Tracking Daily task organization.
Recruitment Hiring pipeline management.
Procurement Vendor and purchase process tracking.

Project Templates in Orangescrum give your team a head start — standardizing workflows, boosting productivity, and ensuring every project begins with clarity and structure.

Reports & Analytics

The Reports & Analytics module in Orangescrum Cloud offers a wide range of project and team performance insights through visual reports and detailed data breakdowns.

It empowers teams, managers, and executives to monitor progress, identify bottlenecks, and make informed decisions for continuous improvement.

Track what’s working, fix what’s not, and plan your next move smarter.

Types of Reports

Orangescrum divides reports into three major categories:

  • Task Analysis Reports – Understand task trends, resolution time, and workflow performance.
  • Time & Resource Reports – Evaluate how your team spends time and resources.
  • Agile & Others Reports – (For Scrum boards, backlog velocity, and sprint analytics).

Task Analysis Reports

1. Average Age Report

Purpose: Displays the average number of days open tasks have been active in each project.

Why it matters: Helps you track backlog health and identify long-pending work.

How to use:

  • Select a Project Name.
  • Choose Period (Daily, Weekly, Monthly).
  • Set the Days Previously range (e.g., last 7 or 30 days).
  • Click Submit to generate the report.

Insights Provided:

  • Average task age in days
  • Total unresolved (new & in-progress) tasks
  • Task aging trend line

Use this to ensure older tasks don’t clog your backlog.

2. Resolution Time Report

Purpose: Tracks how long tasks take to be resolved from creation to closure.

Why it matters: Measures team efficiency and adherence to delivery timelines.

How to use:

  • Select a Project Name and Period (Daily, Weekly, Monthly).
  • Choose how many Days previously you want to analyze.
  • Click Submit to view resolution trends.

Insights Provided:

  • Total resolution time (in days)
  • Average resolution time per task
  • Planned vs. actual closure comparison

A must-have metric for understanding delivery speed.

3. Recently Created Tasks Report

Purpose: Shows how many new tasks have been created within a selected date range.

Why it matters: Helps managers assess workload inflow and plan allocations.

How to use:

  • Choose Project Name → Select Period (Daily/Weekly) → Define Days Previously → Click Submit.

Insights Provided:

  • Count of unresolved (new & in-progress) vs. resolved & closed tasks
  • Trendline showing task creation frequency

Ideal for sprint planning and monitoring task inflow rates.

4. Created vs. Resolved Tasks Report

Purpose: Compares how many tasks were created versus resolved over a specific period.

Why it matters: Indicates whether your team is keeping up with its workload.

How to use:

  • Select Project Name, Period, and Days Previously.
  • Toggle Cumulative Totals to view aggregated trends.

Insights Provided:

  • Daily or cumulative count of created and resolved tasks
  • Backlog growth or reduction trends

Balance your team’s output with incoming work for better backlog control.

5. Bug Report

Purpose: Tracks bug discovery, closure, and severity trends across projects.

Why it matters: Provides QA and product managers visibility into product quality and issue resolution rate.

How to use:

  • Select Start Date and End Date.
  • Click Submit to view charts and trends.

Insights Provided:

  • Bug Trend Chart (Opened vs. Closed)
  • Bug Status Chart (Open, In Progress, Fixed, Closed)
  • Bug Severity Chart (Critical, Major, Minor, Trivial)

A complete quality snapshot for your software projects.

6. Time Since Task Report

Purpose: Tracks how long tasks have remained open, in progress, or completed.

Why it matters: Highlights slow-moving tasks or workflow bottlenecks.

How to use:

  • Select a Project, Date Field (Created, Updated, or Closed), Period, and Days Previously.
  • Click Submit to generate a time-based trend chart.

Insights Provided:

  • Task count by creation/completion date
  • Duration analysis of work in progress
  • Cumulative trends for comparison

Great for understanding your project’s task turnaround time.

Time & Resource Reports

Accessible from the Time & Resource Reports section in the Reports module.

1. Hour Spent Report

Purpose: Shows a burn-down chart of total time and effort spent by resources on different tasks and task types.

Why it matters: Enables managers to visualize productivity and track effort across teams.

Insights Provided:

  • Time spent by each user or team
  • Breakdown by task type (Bugs, Features, Improvements)
  • Cumulative time spent vs. tasks closed

Quickly see if effort aligns with project goals.

2. Timesheet Report

Purpose: Consolidates all logged working hours by user, project, and task.

Why it matters: Essential for payroll, billing, and performance tracking.

Insights Provided:

  • Estimated vs. Logged hours
  • Billable vs. Non-Billable time
  • Submitted, Approved, and Rejected timesheets

Ideal for tracking productivity and financial compliance.

3. Profitability Report

Purpose: Provides a summary of budgets, costs, and income for all active projects.

Why it matters: Helps management evaluate financial health and profitability at a glance.

Insights Provided:

  • Budget allocation and utilization
  • Cost of resources vs. earned revenue
  • Profit margin trends

Measure your project ROI with precision.

Agile & Scrum Reports

For teams using Orangescrum’s Agile Boards, this section displays sprint performance metrics such as:

  • Sprint Velocity
  • Burndown Charts
  • Story Points Completed
  • Workload by Sprint

Enable continuous improvement in Agile workflows.

Exporting Reports

All reports in Orangescrum can be exported for review, presentations, or audits.

Steps:

  1. Open any report view.
  2. Apply filters (Date, Project, Resource, etc.).
  3. Click Export → CSV or PDF.

Exports retain chart data and column structures for easy offline analysis.

Filters & Customization

Each report allows you to fine-tune data using:

Filter Description
Project Name Choose specific projects to analyze.
Date Range Set start and end dates for custom periods.
Period Daily, Weekly, Monthly summary views.
Cumulative Totals Show aggregated or daily data points.
Days Previously Define retrospective analysis duration (e.g., last 7 days).

Flexible filters let you drill down into exactly what you need.

Best Practices

  • Schedule weekly report reviews with your team.
  • Use “Created vs. Resolved” to balance incoming and outgoing workloads.
  • Review “Bug Reports” before every release cycle.
  • Monitor “Resolution Time” to maintain healthy SLAs.
  • Track “Profitability” monthly for accurate financial reporting.

Resource Management

Plan, allocate, and track your team’s time efficiently.

The Resource Management module in Orangescrum Cloud provides a complete view of how your team’s time is planned, used, and optimized across projects.

It allows project managers to track utilization, allocation, and team performance in real time—ensuring that resources are neither underused nor overloaded.

From estimated hours to actual time spent, Orangescrum gives you the visibility you need to manage people effectively.

Why Use Resource Management

  • Balance Workload: Avoid burnout by tracking utilization across tasks and projects.
  • Optimize Productivity: Compare estimated vs. logged hours to identify inefficiencies.
  • Enhance Profitability: Distinguish between billable and non-billable work.
  • Data-Driven Decisions: Generate utilization and allocation reports for better forecasting.
  • Improve Accountability: Every resource log is time-stamped and project-linked.

Accessing Resource Management

To access the Resource Management module:

  1. Go to the Left Navigation Menu.
  2. Click Resource Mgmt → Resource Utilization.
  3. Select your preferred date range at the top-right corner of the page.
  4. View utilization data across all team members and projects.

By default, the dashboard shows utilization within the current week. You can adjust the timeline for broader insights.

Understanding the Resource Utilization Report

The Resource Utilization Report provides detailed visibility into how much time each team member spends versus what was estimated.

Column Description
Date Displays the date when the effort was logged or estimated.
Resource Name of the team member working on tasks or projects.
Estimated Hour(s) The total planned or assigned hours for that day.
Spent Hour Actual time logged through time tracking or timesheets.
Billable Indicates whether the logged time is billable to the client (Yes/No).

At the bottom of the report, Orangescrum also summarizes:

  • Total Estimated Hours
  • Total Logged Hours
  • Total Billable and Non-Billable Hours

This comparison helps managers evaluate planning accuracy and utilization performance.

Top Summary Indicators

At the top-right of the dashboard, you’ll see quick metrics for the selected period:

  • Estimated: Total planned hours across all users and projects.
  • Logged: Actual hours recorded in timesheets.
  • Billable: Total time that contributes to client billing.
  • Non-Billable: Internal or overhead time not billable to clients.

Example from your view:

Estimated: 113 hrs | Logged: 156 hrs 51 mins | Billable: 60 hrs 53 mins | Non-Billable: 95 hrs 58 mins

If logged hours exceed estimated hours, it indicates potential overrun or overtime.

Pagination & Navigation

At the bottom of the page, use the pagination controls (< 1 2 3 4 5 >) to browse utilization data across multiple pages or dates.

This allows you to track historical utilization trends over extended periods.

Pagination helps in reviewing time data without overloading your screen.

Filtering Resource Utilization Data

You can refine your view using filters:

  • By Date Range: Select specific start and end dates (e.g., last 2 weeks or last month).
  • By Resource: Focus on one team member to view individual performance.
  • By Project: Review utilization within a single client or project scope.
  • By Billable Type: Toggle between Billable and Non-Billable hours for financial insights.

Use the filter icon at the top-right to customize your report.

Exporting the Report

You can export the Resource Utilization Report for offline use or client reporting:

  1. Click the Export as CSV or PDF option at the top-right corner.
  2. Choose the format you prefer.
  3. The exported report includes all columns — date, resource name, estimated, spent, and billable status.

Exported reports are ideal for billing, invoicing, and performance reviews.

How the Data Is Calculated

The data in Resource Utilization is automatically fetched from:

  • Tasks (assigned estimated hours)
  • Timesheets / Time Logs (actual hours spent)
  • User Profile Settings (daily work capacity)

Orangescrum then compares Estimated vs. Logged Hours to display daily utilization.

Formula:

Utilization % = (Logged Hours ÷ Estimated Hours) × 100

This helps you understand whether your team is working below, at, or beyond their planned capacity.

Billable vs. Non-Billable Hours

Type Meaning
Billable Hours Time that can be charged to a client for completed project work.
Non-Billable Hours Internal activities such as meetings, training, or admin tasks.

This distinction allows finance and project management teams to monitor profitability and efficiency accurately.

Aim to keep a healthy balance between billable and non-billable work.

Interpreting Utilization Data

Use the report to spot key performance indicators:

Scenario What It Means Recommended Action
Logged hours > Estimated Possible overtime or poor estimation accuracy. Review task estimates and workload balance.
Logged hours < Estimated Resource underutilized or incomplete work. Reallocate tasks or adjust planning.
High Non-Billable Hours Too much time spent on internal activities. Review and limit unproductive work.
High Billable Hours Efficient client time usage. Monitor workload to prevent burnout.

This data gives you both operational and financial visibility.

Team Utilization vs. Resource Allocation

The Resource Mgmt tab includes multiple related reports:

Report Description
Resource Utilization Tracks actual vs. estimated time per resource.
Resource Availability Shows how much free capacity each resource has.
Resource Allocation Displays how resources are distributed across projects.
Team Utilization Aggregated view of utilization across the entire team.

All reports are interconnected — giving you a 360° view of team performance.

Best Practices

  • Regularly review utilization reports to balance workloads.
  • Track billable vs. non-billable hours for better profitability.
  • Compare estimation accuracy over time for better forecasting.
  • Use export reports for weekly management reviews.
  • Train teams to log time daily to ensure real-time accuracy.

Consistent tracking builds transparency and predictability across projects.

Troubleshooting

If data appears incorrect or incomplete:

  • Confirm time logs are submitted for all users and dates.
  • Check if estimated hours are added to each task.
  • Refresh the report after updating time entries.
  • Ensure the correct date range is selected.
  • Re-export the report if older data was recently updated.

Still seeing discrepancies? Contact Orangescrum Support for detailed analysis.

Summary

Feature Description
Resource Utilization Report Tracks planned vs. actual hours daily.
Billable & Non-Billable Split Distinguishes client-charged vs. internal hours.
Filters & Export Customize and export reports easily.
Data Integration Syncs automatically with time logs and tasks.
Team Visibility Helps in balancing workload and improving efficiency.

With Orangescrum’s Resource Management module, you can monitor time, optimize allocation, and make every project hour count.

Agile Project Management

Plan sprints. Deliver iteratively. Empower your teams to move faster.

Agile Project Management in Orangescrum Cloud helps teams deliver value faster, adapt to change, and maintain transparency throughout the project lifecycle.

Whether you follow Scrum, Kanban, or a hybrid model, Orangescrum provides the flexibility to manage sprints, tasks, backlogs, and reports — all from one unified workspace.

Agile in Orangescrum turns chaos into clarity — empowering your team to collaborate, iterate, and improve continuously.

Why Use Agile Project Management

  • Sprint Planning Made Easy: Break down large goals into achievable iterations.
  • Visibility Across Teams: Track every task, story, and bug in real time.
  • Adaptive Scheduling: Shift priorities and reassign work instantly as plans evolve.
  • Measurable Progress: Use velocity and burndown charts to track outcomes objectively.
  • Continuous Improvement: Learn from sprint retrospectives and improve each cycle.

Agile Framework in Orangescrum

Orangescrum supports all major Agile workflows:

Framework Description
Scrum Sprint-based execution with defined roles (Product Owner, Scrum Master, Team).
Kanban Continuous workflow using visual task boards for real-time updates.
Hybrid Mix Scrum’s sprint structure with Kanban’s flexibility for dynamic teams.

Choose what fits your team best — Orangescrum adapts to your process, not the other way around.

Core Components of Agile in Orangescrum

Component Purpose
Epics High-level goals or major features broken down into user stories.
User Stories Describe what the user wants to achieve (“As a user, I want…”).
Tasks & Subtasks Actionable steps to complete stories and deliver functionality.
Sprints Time-boxed work cycles for delivering incremental value.
Backlog Central repository of all upcoming user stories, tasks, and ideas.
Agile Board (Kanban) Visual view to move tasks across stages: To Do → In Progress → Done.

Getting Started with Agile in Orangescrum

Step 1: Enable Agile View

  1. Navigate to Settings → Project Settings → Agile / Scrum.
  2. Enable Agile Project View for your workspace or specific project.

Pro Tip: Keep sprints short (1–2 weeks) for faster feedback and flexibility.

Managing the Backlog

The Backlog acts as your idea vault — capturing everything that hasn’t been assigned to a sprint yet.

  • Add Epics, Stories, and Tasks directly to your backlog.
  • Prioritize work by dragging items to the top.
  • Move items into active sprints when ready for execution.
  • Tag backlog items with labels or priority levels for clarity.

A well-groomed backlog keeps your sprints smooth and predictable.

Working with the Agile Board

The Agile (Kanban) Board gives you a visual way to track sprint progress.

Column Meaning
To Do Planned work that hasn’t started.
In Progress Tasks currently being worked on.
In Review Work completed and awaiting QA or approval.
Done Finished tasks ready for release or closure.

You can:

  • Drag and drop tasks between columns.
  • Assign or reassign members instantly.
  • Apply filters (by assignee, priority, or label).
  • View task cards with quick details (title, due date, status).

Visual boards increase transparency and reduce status meetings.

Tracking Sprint Progress

Orangescrum provides built-in metrics and dashboards to track sprint health:

Report Description
Burndown Chart Shows remaining work vs. time — helps forecast completion.
Velocity Chart Tracks the average work completed per sprint to measure consistency.
Sprint Summary Report Displays completed, in-progress, and pending tasks.
Team Performance Report Evaluates contributions across members.

These insights help Scrum Masters and managers adjust workloads or improve planning accuracy.

Agile Roles in Orangescrum

Role Responsibility
Product Owner Defines priorities and maintains backlog clarity.
Scrum Master Facilitates sprint planning, stand-ups, and removes blockers.
Team Members Execute assigned work and update task statuses.
Stakeholders / Clients View sprint progress and delivery outcomes.

Use Roles & Permissions in Settings to control access across Agile teams.

Collaborating During Sprints

Collaboration in Agile is key to success.

In Orangescrum, teams can:

  • Use Comments to discuss issues within tasks or stories.
  • Mention teammates using @username to trigger notifications.
  • Attach screenshots, design files, or documents from OneDrive / Google Drive.
  • Record daily stand-up updates via Daily Catch-Up emails or activity logs.

Real-time communication helps teams adapt quickly to sprint challenges.

Completing and Closing Sprints

At the end of each sprint:

  1. Review completed and pending items.
  2. Move unfinished tasks back to the backlog or next sprint.
  3. Update sprint status to Completed.
  4. Generate Sprint Summary Reports for stakeholders.
  5. Conduct a Retrospective to note what worked and what didn’t.

Continuous improvement ensures every sprint is better than the last.

Integrations that Enhance Agile Workflows

  • Slack Integration: Get instant sprint updates in team channels.
  • GitHub Integration: Sync commits and pulls requests directly with user stories or bugs.
  • Zapier Integration: Automate sprint creation, task tracking, and notifications.
  • OneDrive / Google Drive: Attach supporting files for user stories or documentation.

Integrations connect your Agile ecosystem — from code to communication.

Best Practices for Agile in Orangescrum

  • Keep sprints short (1–2 weeks) and focused.
  • Conduct regular backlog grooming sessions.
  • Use burndown charts to monitor daily progress.
  • Hold daily stand-ups to discuss blockers.
  • Review retrospectives and adjust processes continuously.
  • Encourage transparency and ownership among team members.

Agility is a mindset — not just a process.

With Agile Project Management in Orangescrum Cloud, your team can plan smarter, execute faster, and deliver better — one sprint at a time.

Bug Tracking

Identify issues faster. Track progress clearly. Deliver quality consistently.

The Bug Tracking module in Orangescrum Cloud helps project teams manage software defects and quality issues efficiently from detection to resolution.

It enables testers, developers, and project managers to collaborate in one centralized workspace — ensuring that every bug is properly logged, prioritized, assigned, and resolved on time.

Turn quality assurance into a streamlined workflow — detect early, fix fast, and release confidently.

Why Use Bug Tracking in Orangescrum

  • Centralized Issue Management – Keep all reported bugs organized and searchable in one place.
  • Faster Resolution – Assign issues instantly to the right developer or team member.
  • Improved Communication – Discuss, attach screenshots, and update status in real time.
  • Increased Product Quality – Ensure every bug is logged, tracked, and verified before release.
  • Insightful Reports – Analyze bug trends, open/closed rates, and team performance.

Accessing the Bug Tracking Module

You can access the bug tracking area in two ways:

  1. From the Main Sidebar → Bug Tracking → Bug List
  2. Inside a Project Workspace → Bug Tab

Each project has its own bug list — so you can filter issues by product, release, or client.

How to Log a New Bug

  1. Go to your project’s Bug Tab.
  2. Click + Add Bug.
  3. Enter the required details:
    • Bug Title – A clear and concise name for the issue.
    • Description / Steps to Reproduce – Detailed explanation and how the issue can be replicated.
    • Project & Task Reference – Optionally link the bug to a specific task or feature.
    • Priority – Select Low, Medium, High, or Critical.
    • Status – Default is New.
    • Reported By – The person who identified the issue.
    • Assigned To – The developer responsible for fixing it.
    • Attachments – Add screenshots, logs, or supporting files.
  4. Click Save — the bug will appear in the project’s bug list immediately.

Bugs can also be added through integrations like GitHub for code-linked issue management.

Understanding Bug Fields

Field Description
Bug ID Unique identifier for tracking and referencing each issue.
Title Short description of the problem.
Description Detailed context, steps to reproduce, or observed behavior.
Project Links the bug to the relevant project or module.
Status Indicates the current stage (New, Assigned, In Progress, Fixed, Closed).
Priority Defines urgency — helps in sorting and triage.
Assigned To Developer or tester responsible for resolving it.
Reported By User who initially found or reported the bug.
Created & Updated Dates Tracks issue lifecycle for accountability.
Attachments Screenshots or error logs for better understanding.

Detailed bug data helps teams fix faster and track accountability.

Bug Lifecycle in Orangescrum

Each bug follows a standard workflow through these stages:

Stage Description
New Issue is freshly reported and awaiting triage.
Assigned Assigned to a developer or QA member.
In Progress The developer is actively fixing the issue.
Fixed Code changes completed and pushed for testing.
Verified QA tests and confirms that the issue is resolved.
Closed Bug fix confirmed and completed successfully.
Reopened If the issue reappears or was not fully resolved.

You can customize these stages based on your project workflow.

Managing Bugs

  • Use Filters to sort bugs by priority, assignee, or status.
  • Update status as progress is made.
  • Add comments or tag users using @mentions for quick collaboration.
  • Attach screenshots or documents directly for context.
  • Bulk-edit multiple bugs to change status or assignment.

Instant updates keep everyone in sync — no need for separate email threads.

Bug Prioritization

Each bug can be classified by urgency to help your team focus on what matters most:

Priority Use Case
Critical Breaks core functionality or blocks development.
High Major issue affecting multiple users.
Medium Functional issue with limited scope.
Low Minor defect or cosmetic error.

Regular bug triage meetings help teams plan fixes efficiently.

Viewing Bugs

You can visualize bugs in multiple views for better clarity:

View Description
List View Default tabular view showing all bugs, priorities, and statuses.
Kanban View Drag-and-drop interface to move bugs through stages visually.
Filter View Focus on specific users, projects, or statuses.

Kanban view is perfect for agile QA and sprint review cycles.

Linking Bugs to Tasks

Bugs can be associated with existing project tasks to maintain traceability between features and issues.

  1. Open a bug.
  2. Select Link Task or Related Task.
  3. Choose the relevant task from the dropdown.
  4. Save changes — both records will now reference each other.

Linked tasks provide complete visibility from issue to resolution.

Bug Notifications

Stay updated automatically when:

  • A bug is assigned to you.
  • Someone comments or updates a bug.
  • The status or priority changes.

Notifications are delivered via:

  • Email Alerts
  • In-App Notifications
  • Slack Integration

You can configure these alerts in Profile → Notification Settings.

Bug Reports and Analytics

Monitor project health and QA performance using built-in reports:

Report Type Description
Bug Summary Report Overview of all bugs by project, assignee, or status.
Open vs. Closed Bugs Visual ratio of resolved vs. pending issues.
Bug Aging Report Highlights bugs open beyond a certain timeframe.
User Bug Report Tracks how many issues each member reported or fixed.
Priority Breakdown Report Categorizes bugs based on urgency levels.

Download or export bug reports in CSV or PDF format for review meetings.

Integrations for Bug Tracking

Enhance your bug management with integrations:

  • GitHub – Automatically sync issues or pull request bugs.
  • Slack – Receive bug notifications in team channels.
  • Zapier – Automate workflows like “Create a task when a new bug is reported.”
  • OneDrive / Google Drive – Attach logs and screenshots directly from your cloud storage.

Integrations connect your development and QA tools for a unified workflow.

With Orangescrum Bug Tracking, teams can manage issues seamlessly — keeping every release clean, stable, and on schedule.

Time Tracking

Track hours accurately. Improve productivity. Bill clients confidently.

The Time Tracking feature in Orangescrum Cloud helps teams record, monitor, and analyze the time spent on each task or project.

It ensures better transparency, accountability, and control over project costs — especially for client billing and resource utilization.

Whether your team is on fixed-price or hourly contracts, Orangescrum lets you log time effortlessly, compare estimated vs. actual hours, and generate timesheet reports in one place.

Accurate time tracking means better forecasting, fair billing, and data-driven performance insights.

Why Use Time Tracking

  • Accurate Billing – Capture every billable minute for clients or internal reporting.
  • Performance Analysis – Identify productive hours and track utilization trends.
  • Project Forecasting – Compare planned vs. actual time for better scheduling.
  • Accountability – Keep team members responsible for their daily progress.
  • Resource Optimization – Balance workload distribution and avoid burnout.

Accessing Time Tracking

You can access Time Tracking in three ways:

  1. Project Sidebar → Time Log
  2. Top Navigation Bar → Time Entry Icon
  3. Within Tasks → Log Time Tab

Wherever you’re working, you can log hours without leaving your task or project workspace.

How to Log Time

  1. Navigate to your project or task.
  2. Click Log Time or Add Time Entry.
  3. Fill in the required details:
    • Date: When the work was done.
    • User / Resource: Who performed the work.
    • Task: The associated work item.
    • Hours Spent: Actual duration.
    • Description / Notes: Brief summary of the work completed.
    • Billable or Non-Billable: Select based on client agreements.
  4. Click Save to record your time entry.

Admins and project owners can also log or edit time entries for their team members.

Using the Timer

Prefer real-time tracking? Use Orangescrum’s Live Timer to capture your work duration automatically.

  1. Open a task and click Start Timer.
  2. Work on your task — the timer runs in the background.
  3. Click Stop Timer once done.
  4. Review and confirm the logged hours before saving.

This method ensures accuracy without manual entry errors.

Daily & Weekly Timesheets

Orangescrum automatically compiles all your time logs into Timesheets that can be reviewed daily or weekly.

View Description
Daily Timesheet Displays the total hours logged each day, by user or project.
Weekly Timesheet Summarizes hours logged over a full week for performance analysis.
User Timesheet Shows all time entries of an individual user.
Project Timesheet Consolidates hours spent on tasks within a specific project.

Managers can review, approve, or reject entries before billing.

Comparing Estimated vs. Actual Hours

When you create tasks, you can define Estimated Hours for planning purposes.
As your team logs actual work hours, Orangescrum automatically compares them to highlight deviations.

  • If Actual > Estimated, the task shows an overrun alert.
  • If Actual < Estimated, the team is ahead of schedule.

This visibility helps you forecast more accurately and improve future estimations.

Billable vs. Non-Billable Hours

While logging time, you can mark entries as Billable (client-invoiced) or Non-Billable (internal effort).

This distinction helps in:

  • Generating client invoices
  • Calculating utilization percentages
  • Reporting internal vs. revenue-generating hours

Billable tracking ensures no revenue leakage in project billing.

Time Tracking Permissions

Role Permission
Admin View, add, edit, and delete all time logs.
Project Owner Manage time logs for their own projects.
User Log and edit their own time entries.
Client View project-level timesheets (if enabled).

Access controls ensure time data remains secure and accurate.

Time Reports

Generate in-depth reports to monitor productivity and costs:

Report Type Description
Weekly Usage Report View total logged hours across projects.
User Time Report Breakdown of each team member’s effort.
Task Time Report Time spent on each task.
Billable vs. Non-Billable Report See revenue-related hours vs. internal work.
Project Estimation vs. Actual Report Compare estimated effort to actual performance.

All reports can be exported to CSV or PDF for management or client sharing.

Integrations for Time Tracking

Enhance your time management workflow with integrations:

  • Slack: Log and get reminders directly from Slack channels.
  • Google Calendar: Sync task deadlines with your calendar.
  • Zapier: Automate time log updates across tools.
  • OneDrive: Attach related timesheet files for client reports.

Integrations make your time tracking effortless and connected.

Best Practices for Effective Time Tracking

  • Encourage team members to log time daily.
  • Use clear task titles and descriptions for context.
  • Review timesheets weekly to catch anomalies early.
  • Separate billable and non-billable hours for accurate billing.
  • Analyze overruns to improve project estimates.

Consistent time tracking builds reliability and supports transparent reporting.

Troubleshooting

If you face issues with time logging or reports:

  • Ensure you have permissions for the selected project.
  • Check your browser time zone matches your Orangescrum settings.
  • Refresh the page or clear browser cache.
  • Reconnect integrations (Slack/Zapier) if automation fails.
  • Contact Orangescrum Support if the issue persists.

Summary

Feature Description
Time Logging Record billable and non-billable work hours.
Live Timer Track work in real time.
Timesheets Review daily and weekly summaries.
Reports Analyze productivity and project effort.
Integrations Connect with Slack, Zapier, Calendar, and more.

With Orangescrum Time Tracking, you gain precision, accountability, and clarity — turning every hour into measurable progress.