In this section, we focus on customizing your projects to match your team’s unique workflow. You’ll learn how to organize tasks with labels, capture project-specific data with custom fields, and manage billing through invoice settings.
These features help you standardize processes, improve visibility, and ensure your projects are structured for efficiency and clarity. By leveraging labels, custom fields, and invoice settings, your team can track work, prioritize tasks, and maintain financial accuracy seamlessly across all projects.
Labels
Use labels to organize, filter, and track tasks more efficiently across your projects.
What Are Labels?
Labels in Orangescrum help you tag and group related tasks for better visibility and quick filtering.
They act like color-coded tags or keywords that let your team easily identify the type, status, or category of a task at a glance.
Labels can be global (available across all projects) or project-level, allowing you to customize them for different workflows or departments.
Example: You can create labels like “Urgent,” “Client Review,” “Pending Approval,” or “Design Update” to instantly identify priorities and categories.
Why Use Labels
- Simplify task organization – quickly tag and locate tasks.
- Improve filtering and reporting – view progress by label or category.
- Enhance communication – make priorities visible to the whole team.
- Boost visibility – quickly identify blocked or high-priority items.
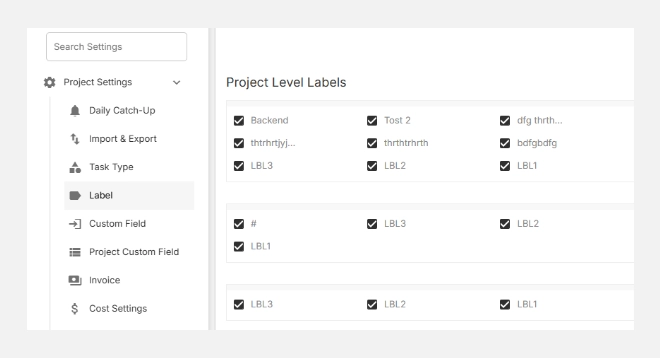
Accessing Label Settings
- Go to Settings → Project Settings → Label.
- You’ll see two main areas:
-
- Default Labels: Labels available across all projects.
- Project-Level Labels: Custom labels created for specific projects.
Creating a New Label
To create a new label:
- Click + New Label (top right).
- In the pop-up window, fill in the required details:
-
- Project: Choose the project this label belongs to.
- Label Name: Enter a descriptive name (e.g., High Priority, Internal Review).
Click Add to save your new label.
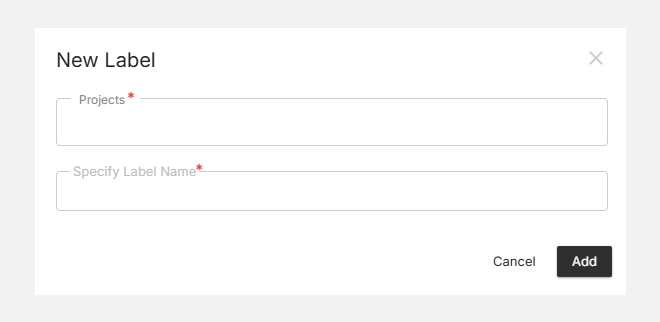
Your label will now appear under the selected project’s list of Project-Level Labels.
Tip: Choose short, action-based names for labels to keep your task board clean and easy to scan.
Editing or Deleting Labels
You can modify or remove existing labels anytime:
- Hover over a label and select the Edit icon to rename or reassign it.
- Click the Delete icon to remove labels that are no longer needed.
- All changes reflect instantly across related tasks.
Note: Deleting a label will untag it from all associated tasks but won’t delete the tasks themselves.
Default vs. Project-Level Labels
| Type |
Scope |
Example Use Case |
| Default Label |
Available across all projects |
“Bug Fix,” “Urgent,” “Client Feedback” |
| Project-Level Label |
Specific to a single project |
“Design QA,” “Phase 1 Review,” “Procurement” |
Best Practice: Use default labels for common task categories and project-level labels for domain-specific tracking.
Using Labels in Projects
Once your labels are set up, you can:
- Apply them to tasks, subtasks, or issues for quick filtering.
- Use Board View to group or color-code tasks by label.
- Filter dashboards and reports by label to track progress or workload distribution.
- Combine multiple labels to cross-filter related work items (e.g., High Priority + QA).
Labels bring clarity and speed to your workflow — helping teams categorize, prioritize, and track work seamlessly across projects.
Custom Fields
Every project is different — and so is the data you need to track.
Custom Fields in Orangescrum let you add personalized fields to tasks or projects beyond the standard ones (like title, due date, or assignee).
These fields help teams capture and display information specific to their business — such as client IDs, budgets, vendor details, or compliance status — right inside Orangescrum.
Example: A marketing team might add a “Campaign Type” field, while a construction company could track “Permit Number” or “Inspection Date.”
Why Use Custom Fields
- Personalize your workspace — track exactly what matters to your projects.
- Improve filtering and reporting — sort and analyze based on custom data points.
- Support multiple use cases — from billing and compliance to HR or engineering workflows.
- Standardize data entry — ensure all teams collect consistent information.
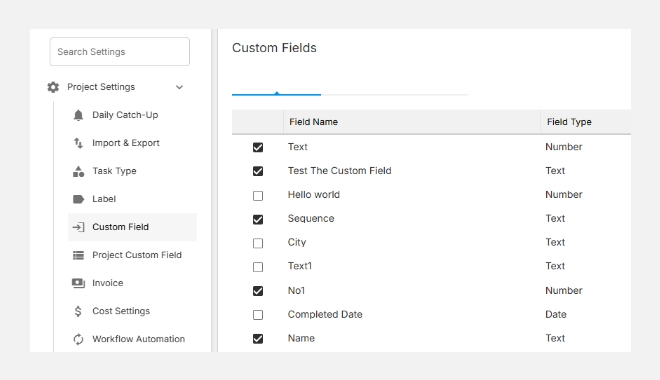
Accessing Custom Field Settings
- Go to Settings → Project Settings → Custom Field.
- You’ll see the option to add, edit, or remove custom fields at the workspace level.
Adding a New Custom Field
To create a new field:
- Click + New Custom Field (top right corner).
- Choose the type of field you want to create from the pop-up menu:
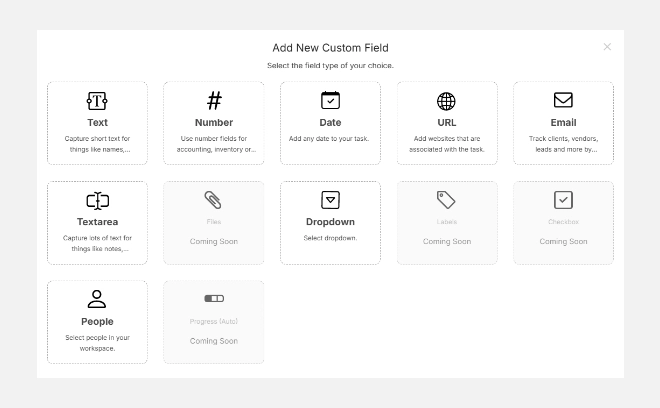
| Field Type |
Description |
Common Use |
| Text |
Capture short text entries |
Client ID, Vendor Name, Document Reference |
| Number |
Store numeric data |
Budget, Quantity, Estimate Hours |
| Date |
Add a date picker field |
Deadline, Inspection Date, Renewal Date |
| URL |
Include a website link |
Resource Links, Document URLs |
| Email |
Capture email addresses |
Client Contact, Vendor Email |
| Textarea |
Add long text fields |
Notes, Comments, Descriptions |
| People |
Select users from your workspace |
Task Owner, Reviewer, Supervisor |
Note: More field types (Dropdown, Checkbox, Labels, Files, Progress) are coming soon!
- Once selected, you’ll be prompted to name the field and decide whether it’s required or optional.
- Click Save to add the field.
Editing or Deleting Custom Fields
- To edit, click the (Edit) icon next to a field.
- To delete, click the (Delete) icon — you’ll be asked to confirm the removal.
- Edits apply instantly across all projects using that field.
Caution: Deleting a field will remove its values from all associated tasks. Export your data before deleting important fields.

Where You Can Use Custom Fields
Custom fields appear in:
- Task Details View – display and edit custom information for individual tasks.
- Project Overview – summarize project-specific data like budgets or phases.
- Reports & Filters – filter tasks or generate analytics based on custom data.
With Custom Fields, you can tailor Orangescrum to your organization’s exact needs — making your workflows smarter, reports richer, and data more meaningful.
Invoice Settings
The Invoice Settings section in Orangescrum Cloud lets you define how billing works across your projects.
Here, you can assign rates, configure project-specific invoicing preferences, and ensure accurate tracking of billable time and expenses.
With centralized control, you can standardize how invoices are generated, prevent errors, and maintain financial transparency between your teams and clients.
Example: If you charge different rates for different projects (e.g., internal vs. client work), Invoice Settings helps you manage that easily.
Why Use Invoice Settings
- Customize billing per project — set unique rates for each client or project.
- Ensure accurate financial tracking — align time logs and tasks with the correct project rate.
- Automate invoices — minimize manual edits and calculations.
- Maintain consistency — use uniform invoice templates across projects.
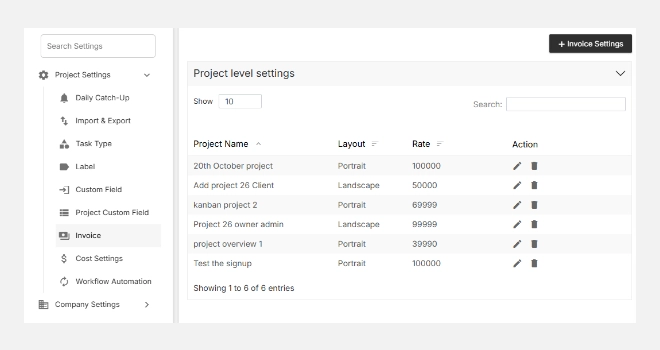
Accessing Invoice Settings
- Go to Settings → Project Settings → Invoice.
- You’ll see a list of existing Project-Level Settings (if any).
- Click + Invoice Settings to add a new configuration.
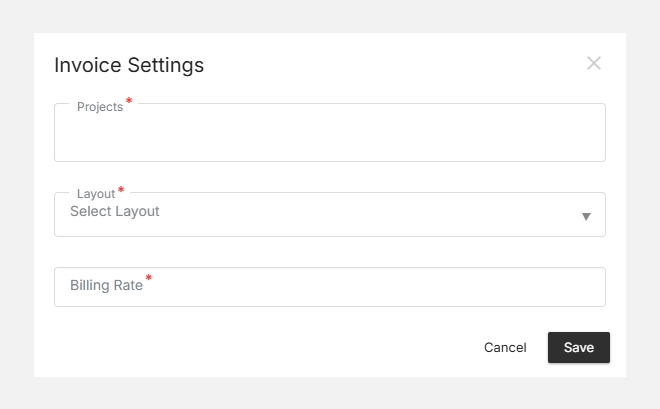
Adding a New Invoice Setting
To create or edit invoice settings for a project:
- Click + Invoice Settings (top right corner).
- From the pop-up window, select:
-
- Project: Choose the project you want to configure.
- Rate: Specify the default hourly or fixed rate for billing.
Click Save to apply changes.
Your settings will now be saved under the Project-Level Settings list and automatically applied when creating invoices for that project.
Tip: Use consistent naming for projects and rates so your finance team can easily match invoices to contracts.
Editing or Removing Invoice Settings
You can modify or remove configurations anytime:
- Click the Edit icon next to a project to update rates or preferences.
- Use the Delete option to remove outdated or incorrect settings.
- Changes take effect immediately across your billing module.
Note: Deleting an invoice setting does not affect past invoices already created.