Resource Management

Plan, allocate, and track your team’s time efficiently.

The Resource Management module in Orangescrum Cloud provides a complete view of how your team’s time is planned, used, and optimized across projects.

It allows project managers to track utilization, allocation, and team performance in real time—ensuring that resources are neither underused nor overloaded.

From estimated hours to actual time spent, Orangescrum gives you the visibility you need to manage people effectively.

Why Use Resource Management

  • Balance Workload: Avoid burnout by tracking utilization across tasks and projects.
  • Optimize Productivity: Compare estimated vs. logged hours to identify inefficiencies.
  • Enhance Profitability: Distinguish between billable and non-billable work.
  • Data-Driven Decisions: Generate utilization and allocation reports for better forecasting.
  • Improve Accountability: Every resource log is time-stamped and project-linked.

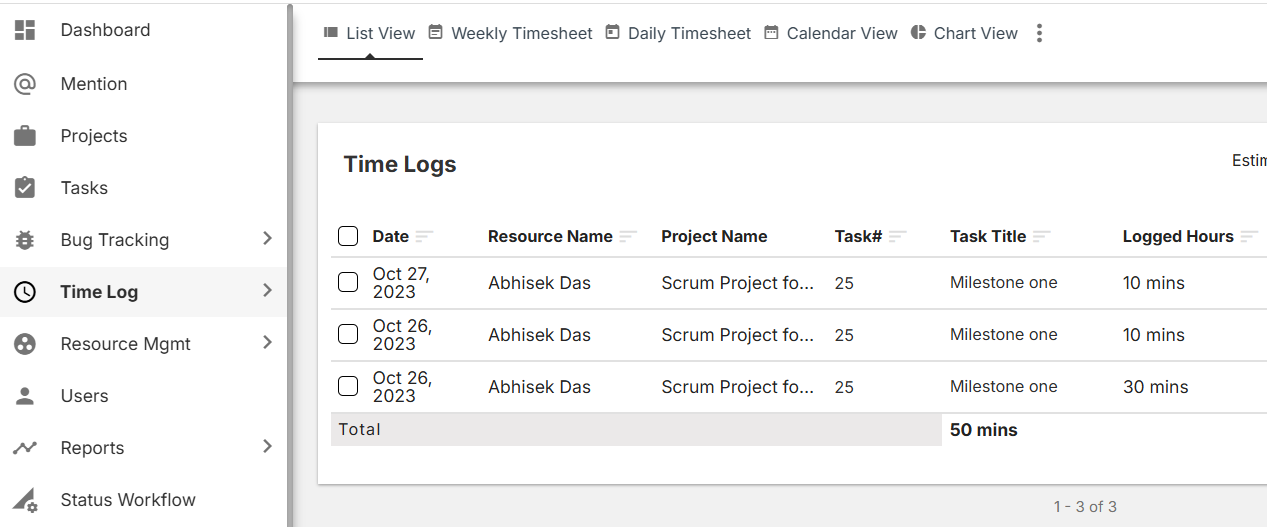
Accessing Resource Management

To access the Resource Management module:

  1. Go to the Left Navigation Menu.
  2. Click Resource Mgmt → Resource Utilization.
  3. Select your preferred date range at the top-right corner of the page.
  4. View utilization data across all team members and projects.

By default, the dashboard shows utilization within the current week. You can adjust the timeline for broader insights.

Understanding the Resource Utilization Report

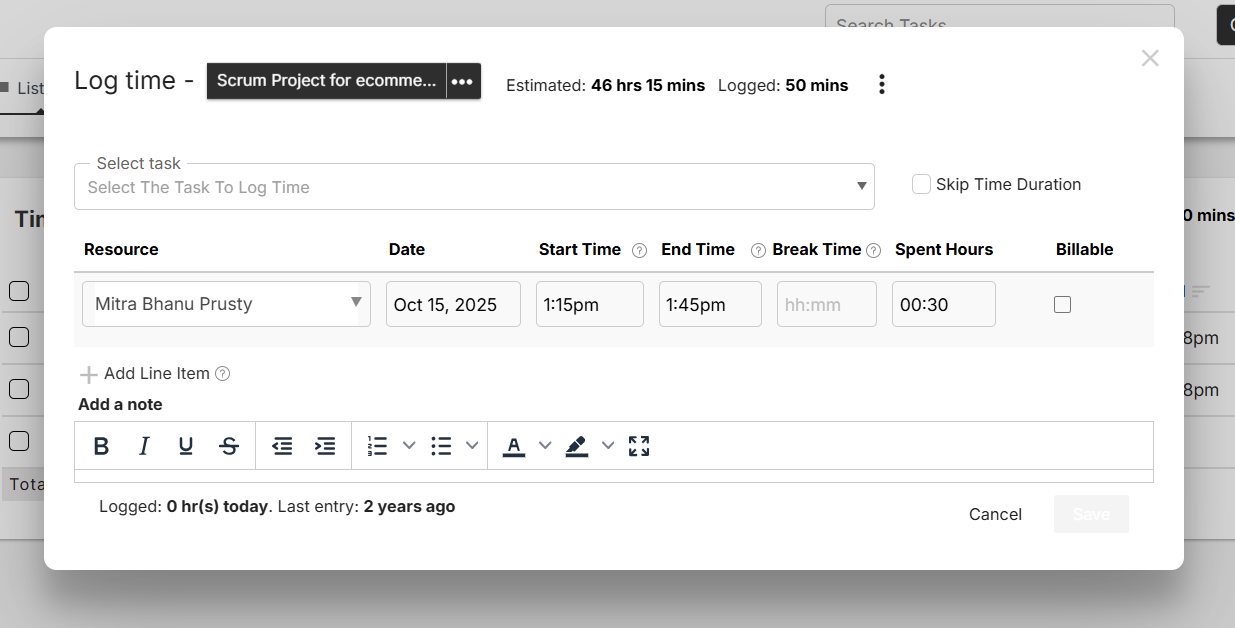
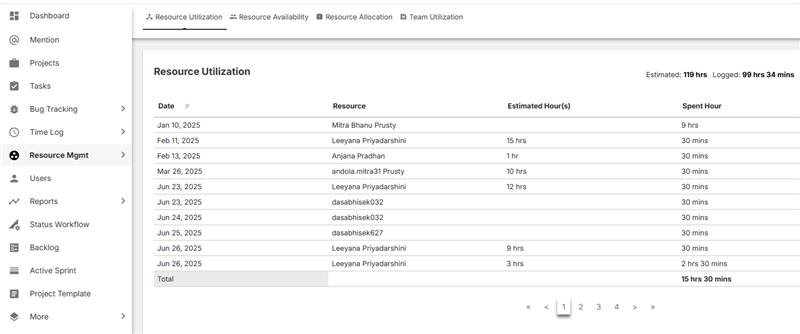
The Resource Utilization Report provides detailed visibility into how much time each team member spends versus what was estimated.

Column Description
Date Displays the date when the effort was logged or estimated.
Resource Name of the team member working on tasks or projects.
Estimated Hour(s) The total planned or assigned hours for that day.
Spent Hour Actual time logged through time tracking or timesheets.
Billable Indicates whether the logged time is billable to the client (Yes/No).

At the bottom of the report, Orangescrum also summarizes:

  • Total Estimated Hours
  • Total Logged Hours
  • Total Billable and Non-Billable Hours

This comparison helps managers evaluate planning accuracy and utilization performance.

Top Summary Indicators

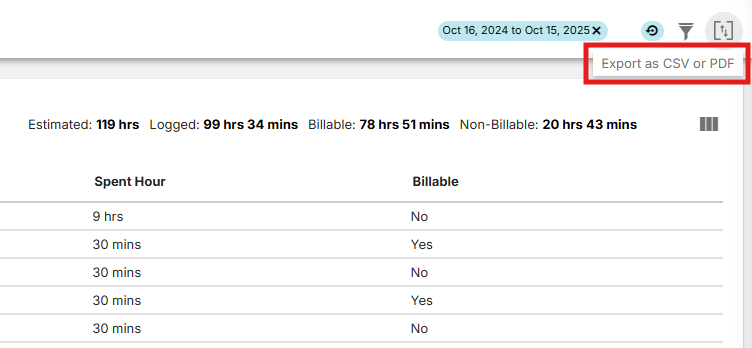
At the top-right of the dashboard, you’ll see quick metrics for the selected period:

  • Estimated: Total planned hours across all users and projects.
  • Logged: Actual hours recorded in timesheets.
  • Billable: Total time that contributes to client billing.
  • Non-Billable: Internal or overhead time not billable to clients.

Example from your view:

Estimated: 113 hrs | Logged: 156 hrs 51 mins | Billable: 60 hrs 53 mins | Non-Billable: 95 hrs 58 mins

If logged hours exceed estimated hours, it indicates potential overrun or overtime.

Pagination & Navigation

At the bottom of the page, use the pagination controls (< 1 2 3 4 5 >) to browse utilization data across multiple pages or dates.

This allows you to track historical utilization trends over extended periods.

Pagination helps in reviewing time data without overloading your screen.

Filtering Resource Utilization Data

You can refine your view using filters:

  • By Date Range: Select specific start and end dates (e.g., last 2 weeks or last month).
  • By Resource: Focus on one team member to view individual performance.
  • By Project: Review utilization within a single client or project scope.
  • By Billable Type: Toggle between Billable and Non-Billable hours for financial insights.

Use the filter icon at the top-right to customize your report.

Exporting the Report

You can export the Resource Utilization Report for offline use or client reporting:

  1. Click the Export as CSV or PDF option at the top-right corner.
  2. Choose the format you prefer.
  3. The exported report includes all columns — date, resource name, estimated, spent, and billable status.

Exported reports are ideal for billing, invoicing, and performance reviews.

How the Data Is Calculated

The data in Resource Utilization is automatically fetched from:

  • Tasks (assigned estimated hours)
  • Timesheets / Time Logs (actual hours spent)
  • User Profile Settings (daily work capacity)

Orangescrum then compares Estimated vs. Logged Hours to display daily utilization.

Formula:

Utilization % = (Logged Hours ÷ Estimated Hours) × 100

This helps you understand whether your team is working below, at, or beyond their planned capacity.

Billable vs. Non-Billable Hours

Type Meaning
Billable Hours Time that can be charged to a client for completed project work.
Non-Billable Hours Internal activities such as meetings, training, or admin tasks.

This distinction allows finance and project management teams to monitor profitability and efficiency accurately.

Aim to keep a healthy balance between billable and non-billable work.

Interpreting Utilization Data

Use the report to spot key performance indicators:

Scenario What It Means Recommended Action
Logged hours > Estimated Possible overtime or poor estimation accuracy. Review task estimates and workload balance.
Logged hours < Estimated Resource underutilized or incomplete work. Reallocate tasks or adjust planning.
High Non-Billable Hours Too much time spent on internal activities. Review and limit unproductive work.
High Billable Hours Efficient client time usage. Monitor workload to prevent burnout.

This data gives you both operational and financial visibility.

Team Utilization vs. Resource Allocation

The Resource Mgmt tab includes multiple related reports:

Report Description
Resource Utilization Tracks actual vs. estimated time per resource.
Resource Availability Shows how much free capacity each resource has.
Resource Allocation Displays how resources are distributed across projects.
Team Utilization Aggregated view of utilization across the entire team.

All reports are interconnected — giving you a 360° view of team performance.

Best Practices

  • Regularly review utilization reports to balance workloads.
  • Track billable vs. non-billable hours for better profitability.
  • Compare estimation accuracy over time for better forecasting.
  • Use export reports for weekly management reviews.
  • Train teams to log time daily to ensure real-time accuracy.

Consistent tracking builds transparency and predictability across projects.

Troubleshooting

If data appears incorrect or incomplete:

  • Confirm time logs are submitted for all users and dates.
  • Check if estimated hours are added to each task.
  • Refresh the report after updating time entries.
  • Ensure the correct date range is selected.
  • Re-export the report if older data was recently updated.

Still seeing discrepancies? Contact Orangescrum Support for detailed analysis.

Summary

Feature Description
Resource Utilization Report Tracks planned vs. actual hours daily.
Billable & Non-Billable Split Distinguishes client-charged vs. internal hours.
Filters & Export Customize and export reports easily.
Data Integration Syncs automatically with time logs and tasks.
Team Visibility Helps in balancing workload and improving efficiency.

With Orangescrum’s Resource Management module, you can monitor time, optimize allocation, and make every project hour count.

Agile Project Management

Plan sprints. Deliver iteratively. Empower your teams to move faster.

Agile Project Management in Orangescrum Cloud helps teams deliver value faster, adapt to change, and maintain transparency throughout the project lifecycle.

Whether you follow Scrum, Kanban, or a hybrid model, Orangescrum provides the flexibility to manage sprints, tasks, backlogs, and reports — all from one unified workspace.

Agile in Orangescrum turns chaos into clarity — empowering your team to collaborate, iterate, and improve continuously.

Why Use Agile Project Management

  • Sprint Planning Made Easy: Break down large goals into achievable iterations.
  • Visibility Across Teams: Track every task, story, and bug in real time.
  • Adaptive Scheduling: Shift priorities and reassign work instantly as plans evolve.
  • Measurable Progress: Use velocity and burndown charts to track outcomes objectively.
  • Continuous Improvement: Learn from sprint retrospectives and improve each cycle.

Agile Framework in Orangescrum

Orangescrum supports all major Agile workflows:

Framework Description
Scrum Sprint-based execution with defined roles (Product Owner, Scrum Master, Team).
Kanban Continuous workflow using visual task boards for real-time updates.
Hybrid Mix Scrum’s sprint structure with Kanban’s flexibility for dynamic teams.

Choose what fits your team best — Orangescrum adapts to your process, not the other way around.

Core Components of Agile in Orangescrum

Component Purpose
Epics High-level goals or major features broken down into user stories.
User Stories Describe what the user wants to achieve (“As a user, I want…”).
Tasks & Subtasks Actionable steps to complete stories and deliver functionality.
Sprints Time-boxed work cycles for delivering incremental value.
Backlog Central repository of all upcoming user stories, tasks, and ideas.
Agile Board (Kanban) Visual view to move tasks across stages: To Do → In Progress → Done.

Getting Started with Agile in Orangescrum

Step 1: Enable Agile View

  1. Navigate to Settings → Project Settings → Agile / Scrum.
  2. Enable Agile Project View for your workspace or specific project.

Pro Tip: Keep sprints short (1–2 weeks) for faster feedback and flexibility.

Managing the Backlog

The Backlog acts as your idea vault — capturing everything that hasn’t been assigned to a sprint yet.

  • Add Epics, Stories, and Tasks directly to your backlog.
  • Prioritize work by dragging items to the top.
  • Move items into active sprints when ready for execution.
  • Tag backlog items with labels or priority levels for clarity.

A well-groomed backlog keeps your sprints smooth and predictable.

Working with the Agile Board

The Agile (Kanban) Board gives you a visual way to track sprint progress.

Column Meaning
To Do Planned work that hasn’t started.
In Progress Tasks currently being worked on.
In Review Work completed and awaiting QA or approval.
Done Finished tasks ready for release or closure.

You can:

  • Drag and drop tasks between columns.
  • Assign or reassign members instantly.
  • Apply filters (by assignee, priority, or label).
  • View task cards with quick details (title, due date, status).

Visual boards increase transparency and reduce status meetings.

Tracking Sprint Progress

Orangescrum provides built-in metrics and dashboards to track sprint health:

Report Description
Burndown Chart Shows remaining work vs. time — helps forecast completion.
Velocity Chart Tracks the average work completed per sprint to measure consistency.
Sprint Summary Report Displays completed, in-progress, and pending tasks.
Team Performance Report Evaluates contributions across members.

These insights help Scrum Masters and managers adjust workloads or improve planning accuracy.

Agile Roles in Orangescrum

Role Responsibility
Product Owner Defines priorities and maintains backlog clarity.
Scrum Master Facilitates sprint planning, stand-ups, and removes blockers.
Team Members Execute assigned work and update task statuses.
Stakeholders / Clients View sprint progress and delivery outcomes.

Use Roles & Permissions in Settings to control access across Agile teams.

Collaborating During Sprints

Collaboration in Agile is key to success.

In Orangescrum, teams can:

  • Use Comments to discuss issues within tasks or stories.
  • Mention teammates using @username to trigger notifications.
  • Attach screenshots, design files, or documents from OneDrive / Google Drive.
  • Record daily stand-up updates via Daily Catch-Up emails or activity logs.

Real-time communication helps teams adapt quickly to sprint challenges.

Completing and Closing Sprints

At the end of each sprint:

  1. Review completed and pending items.
  2. Move unfinished tasks back to the backlog or next sprint.
  3. Update sprint status to Completed.
  4. Generate Sprint Summary Reports for stakeholders.
  5. Conduct a Retrospective to note what worked and what didn’t.

Continuous improvement ensures every sprint is better than the last.

Integrations that Enhance Agile Workflows

  • Slack Integration: Get instant sprint updates in team channels.
  • GitHub Integration: Sync commits and pulls requests directly with user stories or bugs.
  • Zapier Integration: Automate sprint creation, task tracking, and notifications.
  • OneDrive / Google Drive: Attach supporting files for user stories or documentation.

Integrations connect your Agile ecosystem — from code to communication.

Best Practices for Agile in Orangescrum

  • Keep sprints short (1–2 weeks) and focused.
  • Conduct regular backlog grooming sessions.
  • Use burndown charts to monitor daily progress.
  • Hold daily stand-ups to discuss blockers.
  • Review retrospectives and adjust processes continuously.
  • Encourage transparency and ownership among team members.

Agility is a mindset — not just a process.

With Agile Project Management in Orangescrum Cloud, your team can plan smarter, execute faster, and deliver better — one sprint at a time.

Bug Tracking

Identify issues faster. Track progress clearly. Deliver quality consistently.

The Bug Tracking module in Orangescrum Cloud helps project teams manage software defects and quality issues efficiently from detection to resolution.

It enables testers, developers, and project managers to collaborate in one centralized workspace — ensuring that every bug is properly logged, prioritized, assigned, and resolved on time.

Turn quality assurance into a streamlined workflow — detect early, fix fast, and release confidently.

Why Use Bug Tracking in Orangescrum

  • Centralized Issue Management – Keep all reported bugs organized and searchable in one place.
  • Faster Resolution – Assign issues instantly to the right developer or team member.
  • Improved Communication – Discuss, attach screenshots, and update status in real time.
  • Increased Product Quality – Ensure every bug is logged, tracked, and verified before release.
  • Insightful Reports – Analyze bug trends, open/closed rates, and team performance.

Accessing the Bug Tracking Module

You can access the bug tracking area in two ways:

  1. From the Main Sidebar → Bug Tracking → Bug List
  2. Inside a Project Workspace → Bug Tab

Each project has its own bug list — so you can filter issues by product, release, or client.

How to Log a New Bug

  1. Go to your project’s Bug Tab.
  2. Click + Add Bug.
  3. Enter the required details:
    • Bug Title – A clear and concise name for the issue.
    • Description / Steps to Reproduce – Detailed explanation and how the issue can be replicated.
    • Project & Task Reference – Optionally link the bug to a specific task or feature.
    • Priority – Select Low, Medium, High, or Critical.
    • Status – Default is New.
    • Reported By – The person who identified the issue.
    • Assigned To – The developer responsible for fixing it.
    • Attachments – Add screenshots, logs, or supporting files.
  4. Click Save — the bug will appear in the project’s bug list immediately.

Bugs can also be added through integrations like GitHub for code-linked issue management.

Understanding Bug Fields

Field Description
Bug ID Unique identifier for tracking and referencing each issue.
Title Short description of the problem.
Description Detailed context, steps to reproduce, or observed behavior.
Project Links the bug to the relevant project or module.
Status Indicates the current stage (New, Assigned, In Progress, Fixed, Closed).
Priority Defines urgency — helps in sorting and triage.
Assigned To Developer or tester responsible for resolving it.
Reported By User who initially found or reported the bug.
Created & Updated Dates Tracks issue lifecycle for accountability.
Attachments Screenshots or error logs for better understanding.

Detailed bug data helps teams fix faster and track accountability.

Bug Lifecycle in Orangescrum

Each bug follows a standard workflow through these stages:

Stage Description
New Issue is freshly reported and awaiting triage.
Assigned Assigned to a developer or QA member.
In Progress The developer is actively fixing the issue.
Fixed Code changes completed and pushed for testing.
Verified QA tests and confirms that the issue is resolved.
Closed Bug fix confirmed and completed successfully.
Reopened If the issue reappears or was not fully resolved.

You can customize these stages based on your project workflow.

Managing Bugs

  • Use Filters to sort bugs by priority, assignee, or status.
  • Update status as progress is made.
  • Add comments or tag users using @mentions for quick collaboration.
  • Attach screenshots or documents directly for context.
  • Bulk-edit multiple bugs to change status or assignment.

Instant updates keep everyone in sync — no need for separate email threads.

Bug Prioritization

Each bug can be classified by urgency to help your team focus on what matters most:

Priority Use Case
Critical Breaks core functionality or blocks development.
High Major issue affecting multiple users.
Medium Functional issue with limited scope.
Low Minor defect or cosmetic error.

Regular bug triage meetings help teams plan fixes efficiently.

Viewing Bugs

You can visualize bugs in multiple views for better clarity:

View Description
List View Default tabular view showing all bugs, priorities, and statuses.
Kanban View Drag-and-drop interface to move bugs through stages visually.
Filter View Focus on specific users, projects, or statuses.

Kanban view is perfect for agile QA and sprint review cycles.

Linking Bugs to Tasks

Bugs can be associated with existing project tasks to maintain traceability between features and issues.

  1. Open a bug.
  2. Select Link Task or Related Task.
  3. Choose the relevant task from the dropdown.
  4. Save changes — both records will now reference each other.

Linked tasks provide complete visibility from issue to resolution.

Bug Notifications

Stay updated automatically when:

  • A bug is assigned to you.
  • Someone comments or updates a bug.
  • The status or priority changes.

Notifications are delivered via:

  • Email Alerts
  • In-App Notifications
  • Slack Integration

You can configure these alerts in Profile → Notification Settings.

Bug Reports and Analytics

Monitor project health and QA performance using built-in reports:

Report Type Description
Bug Summary Report Overview of all bugs by project, assignee, or status.
Open vs. Closed Bugs Visual ratio of resolved vs. pending issues.
Bug Aging Report Highlights bugs open beyond a certain timeframe.
User Bug Report Tracks how many issues each member reported or fixed.
Priority Breakdown Report Categorizes bugs based on urgency levels.

Download or export bug reports in CSV or PDF format for review meetings.

Integrations for Bug Tracking

Enhance your bug management with integrations:

  • GitHub – Automatically sync issues or pull request bugs.
  • Slack – Receive bug notifications in team channels.
  • Zapier – Automate workflows like “Create a task when a new bug is reported.”
  • OneDrive / Google Drive – Attach logs and screenshots directly from your cloud storage.

Integrations connect your development and QA tools for a unified workflow.

With Orangescrum Bug Tracking, teams can manage issues seamlessly — keeping every release clean, stable, and on schedule.

Time Tracking

Track hours accurately. Improve productivity. Bill clients confidently.

The Time Tracking feature in Orangescrum Cloud helps teams record, monitor, and analyze the time spent on each task or project.

It ensures better transparency, accountability, and control over project costs — especially for client billing and resource utilization.

Whether your team is on fixed-price or hourly contracts, Orangescrum lets you log time effortlessly, compare estimated vs. actual hours, and generate timesheet reports in one place.

Accurate time tracking means better forecasting, fair billing, and data-driven performance insights.

Why Use Time Tracking

  • Accurate Billing – Capture every billable minute for clients or internal reporting.
  • Performance Analysis – Identify productive hours and track utilization trends.
  • Project Forecasting – Compare planned vs. actual time for better scheduling.
  • Accountability – Keep team members responsible for their daily progress.
  • Resource Optimization – Balance workload distribution and avoid burnout.

Accessing Time Tracking

You can access Time Tracking in three ways:

  1. Project Sidebar → Time Log
  2. Top Navigation Bar → Time Entry Icon
  3. Within Tasks → Log Time Tab

Wherever you’re working, you can log hours without leaving your task or project workspace.

How to Log Time

  1. Navigate to your project or task.
  2. Click Log Time or Add Time Entry.
  3. Fill in the required details:
    • Date: When the work was done.
    • User / Resource: Who performed the work.
    • Task: The associated work item.
    • Hours Spent: Actual duration.
    • Description / Notes: Brief summary of the work completed.
    • Billable or Non-Billable: Select based on client agreements.
  4. Click Save to record your time entry.

Admins and project owners can also log or edit time entries for their team members.

Using the Timer

Prefer real-time tracking? Use Orangescrum’s Live Timer to capture your work duration automatically.

  1. Open a task and click Start Timer.
  2. Work on your task — the timer runs in the background.
  3. Click Stop Timer once done.
  4. Review and confirm the logged hours before saving.

This method ensures accuracy without manual entry errors.

Daily & Weekly Timesheets

Orangescrum automatically compiles all your time logs into Timesheets that can be reviewed daily or weekly.

View Description
Daily Timesheet Displays the total hours logged each day, by user or project.
Weekly Timesheet Summarizes hours logged over a full week for performance analysis.
User Timesheet Shows all time entries of an individual user.
Project Timesheet Consolidates hours spent on tasks within a specific project.

Managers can review, approve, or reject entries before billing.

Comparing Estimated vs. Actual Hours

When you create tasks, you can define Estimated Hours for planning purposes.
As your team logs actual work hours, Orangescrum automatically compares them to highlight deviations.

  • If Actual > Estimated, the task shows an overrun alert.
  • If Actual < Estimated, the team is ahead of schedule.

This visibility helps you forecast more accurately and improve future estimations.

Billable vs. Non-Billable Hours

While logging time, you can mark entries as Billable (client-invoiced) or Non-Billable (internal effort).

This distinction helps in:

  • Generating client invoices
  • Calculating utilization percentages
  • Reporting internal vs. revenue-generating hours

Billable tracking ensures no revenue leakage in project billing.

Time Tracking Permissions

Role Permission
Admin View, add, edit, and delete all time logs.
Project Owner Manage time logs for their own projects.
User Log and edit their own time entries.
Client View project-level timesheets (if enabled).

Access controls ensure time data remains secure and accurate.

Time Reports

Generate in-depth reports to monitor productivity and costs:

Report Type Description
Weekly Usage Report View total logged hours across projects.
User Time Report Breakdown of each team member’s effort.
Task Time Report Time spent on each task.
Billable vs. Non-Billable Report See revenue-related hours vs. internal work.
Project Estimation vs. Actual Report Compare estimated effort to actual performance.

All reports can be exported to CSV or PDF for management or client sharing.

Integrations for Time Tracking

Enhance your time management workflow with integrations:

  • Slack: Log and get reminders directly from Slack channels.
  • Google Calendar: Sync task deadlines with your calendar.
  • Zapier: Automate time log updates across tools.
  • OneDrive: Attach related timesheet files for client reports.

Integrations make your time tracking effortless and connected.

Best Practices for Effective Time Tracking

  • Encourage team members to log time daily.
  • Use clear task titles and descriptions for context.
  • Review timesheets weekly to catch anomalies early.
  • Separate billable and non-billable hours for accurate billing.
  • Analyze overruns to improve project estimates.

Consistent time tracking builds reliability and supports transparent reporting.

Troubleshooting

If you face issues with time logging or reports:

  • Ensure you have permissions for the selected project.
  • Check your browser time zone matches your Orangescrum settings.
  • Refresh the page or clear browser cache.
  • Reconnect integrations (Slack/Zapier) if automation fails.
  • Contact Orangescrum Support if the issue persists.

Summary

Feature Description
Time Logging Record billable and non-billable work hours.
Live Timer Track work in real time.
Timesheets Review daily and weekly summaries.
Reports Analyze productivity and project effort.
Integrations Connect with Slack, Zapier, Calendar, and more.

With Orangescrum Time Tracking, you gain precision, accountability, and clarity — turning every hour into measurable progress.

Task Management

Break down work. Assign ownership. Track progress. Deliver faster.

Tasks are the foundation of every project in Orangescrum Cloud.

They represent the actionable steps your team needs to complete in order to reach project goals.

The Task Management module helps teams:

  • Create and assign tasks effortlessly
  • Track real-time progress
  • Manage priorities and dependencies
  • Collaborate and share updates in one centralized workspace

Whether you manage agile sprints, client deliverables, or internal initiatives — Orangescrum gives you the clarity and control to execute with precision.

Every successful project starts with well-organized tasks.

Key Capabilities

  • Create and Assign Tasks: Add new tasks quickly, assign them to responsible members, and include start and due dates.
  • Define Priorities: Label tasks as High, Medium, or Low to ensure critical work gets attention first.
  • Set Dependencies: Link related tasks so that one cannot start until another is completed — ideal for sequential workflows.
  • Track Progress in Real-Time: Monitor task status with color-coded indicators such as New, In Progress, On Hold, or Completed.
  • Collaborate with Context: Add comments, @mentions, attachments, and checklists to keep everyone aligned and informed.
  • Visualize Work: Switch between List, Kanban, Calendar, or Gantt views to see your work the way that fits best.
  • Automate and Integrate: Use workflow automation and integrations (like Slack, Zapier, or OneDrive) to simplify task updates and notifications.

How to Create a Task

  • Go to Projects → Select a Project.
  • Click + Add Task or use the quick-add option on the top bar.

  • Fill in task details:
    • Task Title (required)
    • Description / Notes (optional)
    • Assignee (who will do the task)
    • Start & Due Dates
    • Priority (High / Medium / Low)
    • Task Type (Bug, Enhancement, Task, etc.)
    • Status (New, In Progress, Completed)
  • Attach files or link resources (e.g., OneDrive or GitHub).
  • Click Save — your task is added to the selected project.

Pro Tip: Use the “Add Another Task” toggle to quickly add multiple tasks in succession.

Task Views in Orangescrum

You can visualize and manage tasks through multiple, flexible views:

View Type Description
List View Displays all tasks in a simple, sortable table with details like assignee, due date, and status.
Kanban View Visual board with drag-and-drop cards, ideal for agile or sprint-based workflows.
Calendar View Displays tasks by due dates — great for deadline-driven teams.
Gantt Chart View Timeline visualization to see dependencies, progress, and task durations.
Task Group View Organize tasks under logical groupings or milestones.

Switch between views anytime from the top-right of your project workspace.

Understanding Task Fields

Field Purpose
Task Title The name of the work item.
Project Indicates which project the task belongs to.
Assignee The person responsible for completing the task.
Start & Due Dates Helps define the task duration and scheduling.
Priority Flags urgency for team visibility.
Status Tracks current progress stage (New → In Progress → Completed).
Task Type Categorizes the work (e.g., Feature, Bug, Improvement).
Description Details, notes, or context related to the task.
Attachments Files, screenshots, or supporting documents.
Comments Discussion space for updates and clarifications.

Managing and Tracking Tasks

  • Update task status as work progresses.
  • Use filters to view tasks by priority, due date, or assignee.
  • Apply bulk actions to update multiple tasks simultaneously.
  • Add time logs for effort tracking.
  • Review task progress through Project Dashboards and Reports.

Every change made is tracked under the task’s activity log for complete transparency.

Task Collaboration

Collaboration in Orangescrum happens where work happens — inside each task.

You can:

  • @mention teammates to draw attention to a comment or update.
  • Attach documents, screenshots, or spreadsheets.
  • Convert comments into subtasks if needed.
  • Receive real-time notifications for updates, mentions, or due date reminders.

The comment thread keeps the full conversation around a task visible to everyone involved.

Subtasks & Checklists

Break large tasks into smaller actionable steps:

  • Use Subtasks for multi-stage deliverables.
  • Use Checklists for simple, itemized steps.
  • Mark items complete as progress is made — your completion percentage updates automatically.

Subtasks improve accountability and make tracking more granular.

Task Dependencies

Some tasks can’t start until others are finished — and Orangescrum helps manage that easily.

  1. Open the task.
  2. Go to the Dependencies section.
  3. Choose the “Predecessor” task (one that must finish first).
  4. Save changes.

Now, team members will see dependency warnings and accurate scheduling on Gantt charts.

Dependencies ensure proper sequencing and prevent scheduling conflicts.

Task Filters and Sorting

Use advanced filters to find what matters most:

  • Filter by Status, Priority, Assignee, Start Date, End Date, or Category.
  • Sort columns in ascending or descending order for quick insights.
  • Save filters as views for easy reuse.

For example, filter by “High Priority + Due This Week” to focus on urgent items.

Task Notifications

Stay informed through multiple channels:

  • Email Notifications: Get alerts when tasks are created, updated, or assigned.
  • In-App Notifications: See updates and mentions in real time.
  • Slack Integration: Receive task updates directly in your team channels.

Notification preferences can be customized under “Profile Settings → Notifications.”

Time Tracking on Tasks

Accurately track how much time your team spends on each task.

  • Log time manually or start a live timer.
  • Categorize time as billable or non-billable.
  • View total hours in the Timesheet section or reports.

Integrated time tracking helps with resource billing and performance evaluation.

Task Reports

Generate reports to monitor productivity and deadlines:

Report Type Description
Task Summary Report Shows open, closed, and overdue tasks by project or user.
Task Status Report Tracks how work is progressing across stages.
Overdue Task Report Lists all delayed or pending tasks.
User Task Report Displays each user’s workload and completion rate.

Reports are downloadable in CSV or PDF formats for management reviews.

Troubleshooting

If tasks don’t appear or updates aren’t saving:

  • Refresh your browser or clear cache.
  • Verify that you have permission to view or edit tasks in the project.
  • Check your internet connection and plan limits.
  • If using integrations (Slack, Zapier), reauthorize the connection.

For technical help, contact Orangescrum Support through the Help Center.

Summary

Feature Description
Create Tasks Define and assign actionable work items.
Multiple Views Switch between List, Kanban, Calendar, or Gantt.
Task Collaboration Share files, comments, and updates.
Dependencies & Checklists Break work into sequences and steps.
Time Tracking & Reports Measure performance and output.

With Orangescrum’s Task Management, your team gets clarity, accountability, and control — from planning to delivery.

Project Management

Plan smarter, collaborate faster, and deliver projects on time — every time.

Orangescrum Cloud is an all-in-one project management and collaboration platform designed to help teams plan, track, and deliver projects seamlessly — from concept to completion.

Whether you’re managing client projects, internal initiatives, or agile sprints, Orangescrum gives you the visibility, control, and tools you need to stay on track and hit every milestone.

From task creation to time tracking and reporting — manage your entire project lifecycle in one place.

Key Features of Orangescrum Project Management

Project Dashboard: Get a bird’s-eye view of all your projects, with instant access to progress summaries, active tasks, resources, and deadlines.

Task Management: Create, assign, and prioritize tasks. Break complex work into subtasks and use Kanban or List views to track progress easily.

Gantt Charts: Visualize your project timelines and dependencies. Reschedule tasks with drag-and-drop simplicity and keep delivery dates realistic.

Time Tracking: Log hours manually or with timers to monitor resource productivity and project billing accuracy.

Resource Management: Track workloads, balance team availability, and ensure no resource is over or underutilized.

Collaboration Tools: Communicate in real time through comments, file attachments, mentions, and activity feeds — all within the project workspace.

Agile Board: For teams running sprints — plan, execute, and review with agile boards, burndown charts, and velocity tracking.

Reports & Analytics: Generate insightful reports on project progress, productivity, and cost — helping you make data-driven decisions.

How to Create a Project in Orangescrum Cloud

  • Navigate to Projects → Create New Projects.

  • Enter essential details:
    • Project Name
    • Start & End Dates
    • Client/Owner
    • Team Members
    • Billing Type (if applicable)
  • Add a Project Description and attach related files or notes.
  • Click Save — your project workspace is now active!
  • Start adding tasks, milestones, or discussions immediately.

You can create unlimited projects and organize them by department, client, or program.

Understanding the Project Dashboard

The Project Dashboard is your command center — displaying all active and archived projects in one place.

Section Description
Project Cards Display key details such as title, owner, due date, and status.
Progress Bar Shows completion percentage based on closed vs. open tasks.
Filters Sort projects by owner, status, client, or due date.
Quick Actions Edit, duplicate, or archive projects directly from the dashboard.

Use search and filters to locate specific projects in seconds.

Managing Tasks Inside a Project

Within each project, tasks form the foundation of execution.

You can:

  • Add tasks with due dates and priority levels.
  • Assign tasks to team members.
  • Use task groups or milestones for structured breakdowns.
  • Switch between List, Kanban, Calendar, or Gantt views for flexibility.
  • Track updates through activity streams and comments.

Every task can include attachments, checklists, and dependencies to ensure nothing falls through the cracks.

Collaborating with Your Team

Collaboration in Orangescrum happens naturally within the project space.

  • Mention teammates using @username to alert them instantly.
  • Attach documents, spreadsheets, or designs directly from OneDrive, Google Drive, or local files.
  • Track all updates via real-time notifications.
  • Use the Discussion Tab for project-wide communication threads.

Keep all project-related communication organized — no more scattered chats or lost emails.

Monitoring Progress and Performance

Use the built-in analytics to ensure your project stays aligned with timelines and goals.

  • Project Summary Report: Task distribution, completion rate, and time utilization.
  • Task Status Report: Overview of pending, ongoing, and completed tasks.
  • User Productivity Report: Measure resource contributions and logged hours.
  • Timesheet Reports: Evaluate billable vs. non-billable time.

Orangescrum’s live dashboards help managers identify bottlenecks and reallocate resources instantly.

Roles & Permissions

Assign roles to maintain control over data and actions:

Role Access Level
Admin Full access to all projects, settings, and reports.
Project Owner Manages specific projects, tasks, and team assignments.
User Can view and manage assigned tasks.
Client / Guest Limited visibility — ideal for status tracking and feedback.

Custom role configurations are also supported in enterprise plans.

Integrations for Enhanced Project Management

Orangescrum Cloud integrates with your favorite tools to simplify project tracking and collaboration:

  • Slack: Real-time project updates.
  • OneDrive / Google Drive: File sharing.
  • Zapier: Workflow automation.
  • GitHub: Development updates.
  • Google Calendar: Sync deadlines and events.

Integrations help your teams stay connected and reduce manual updates.

Summary

Function Description
Project Dashboard View and manage all projects at a glance.
Task & Time Tracking Assign work, log hours, and monitor progress.
Reports Generate data-driven insights.
Collaboration Keep communication and files in one place.
Integrations Connect Orangescrum with Slack, Zapier, OneDrive, and more.

With Orangescrum Cloud, project management becomes simple, visual, and productive — empowering your team to deliver faster and smarter.